
Having the plants in your images in focus is obviously essential to your photography and the next several entries in this series will discuss how to focus your camera, but there is more to focus than getting everything sharp. There are many situations, for example, in which paying close attention to what is out of focus can make a big difference in the nature of your images. I concluded my last entry with images which differ in depth of field (DOF), which is defined as the distance between the nearest object that looks sharp and the furthest object that looks sharp. In other words, DOF is the depth of the part of the image that looks “in focus” or sharp.
For further reading, here are two of my favorite discussions on the topic of DOF:
• https://www.cambridgeincolour.com/tutorials/depth-of-field.htm
• https://photographylife.com/what-is-depth-of-field
In the images below, the first image has a narrower, (or shallower, tighter or smaller) DOF than the second. Or, to phrase it the other way around, the second image has a greater (or larger, wider or deeper) DOF than the first.
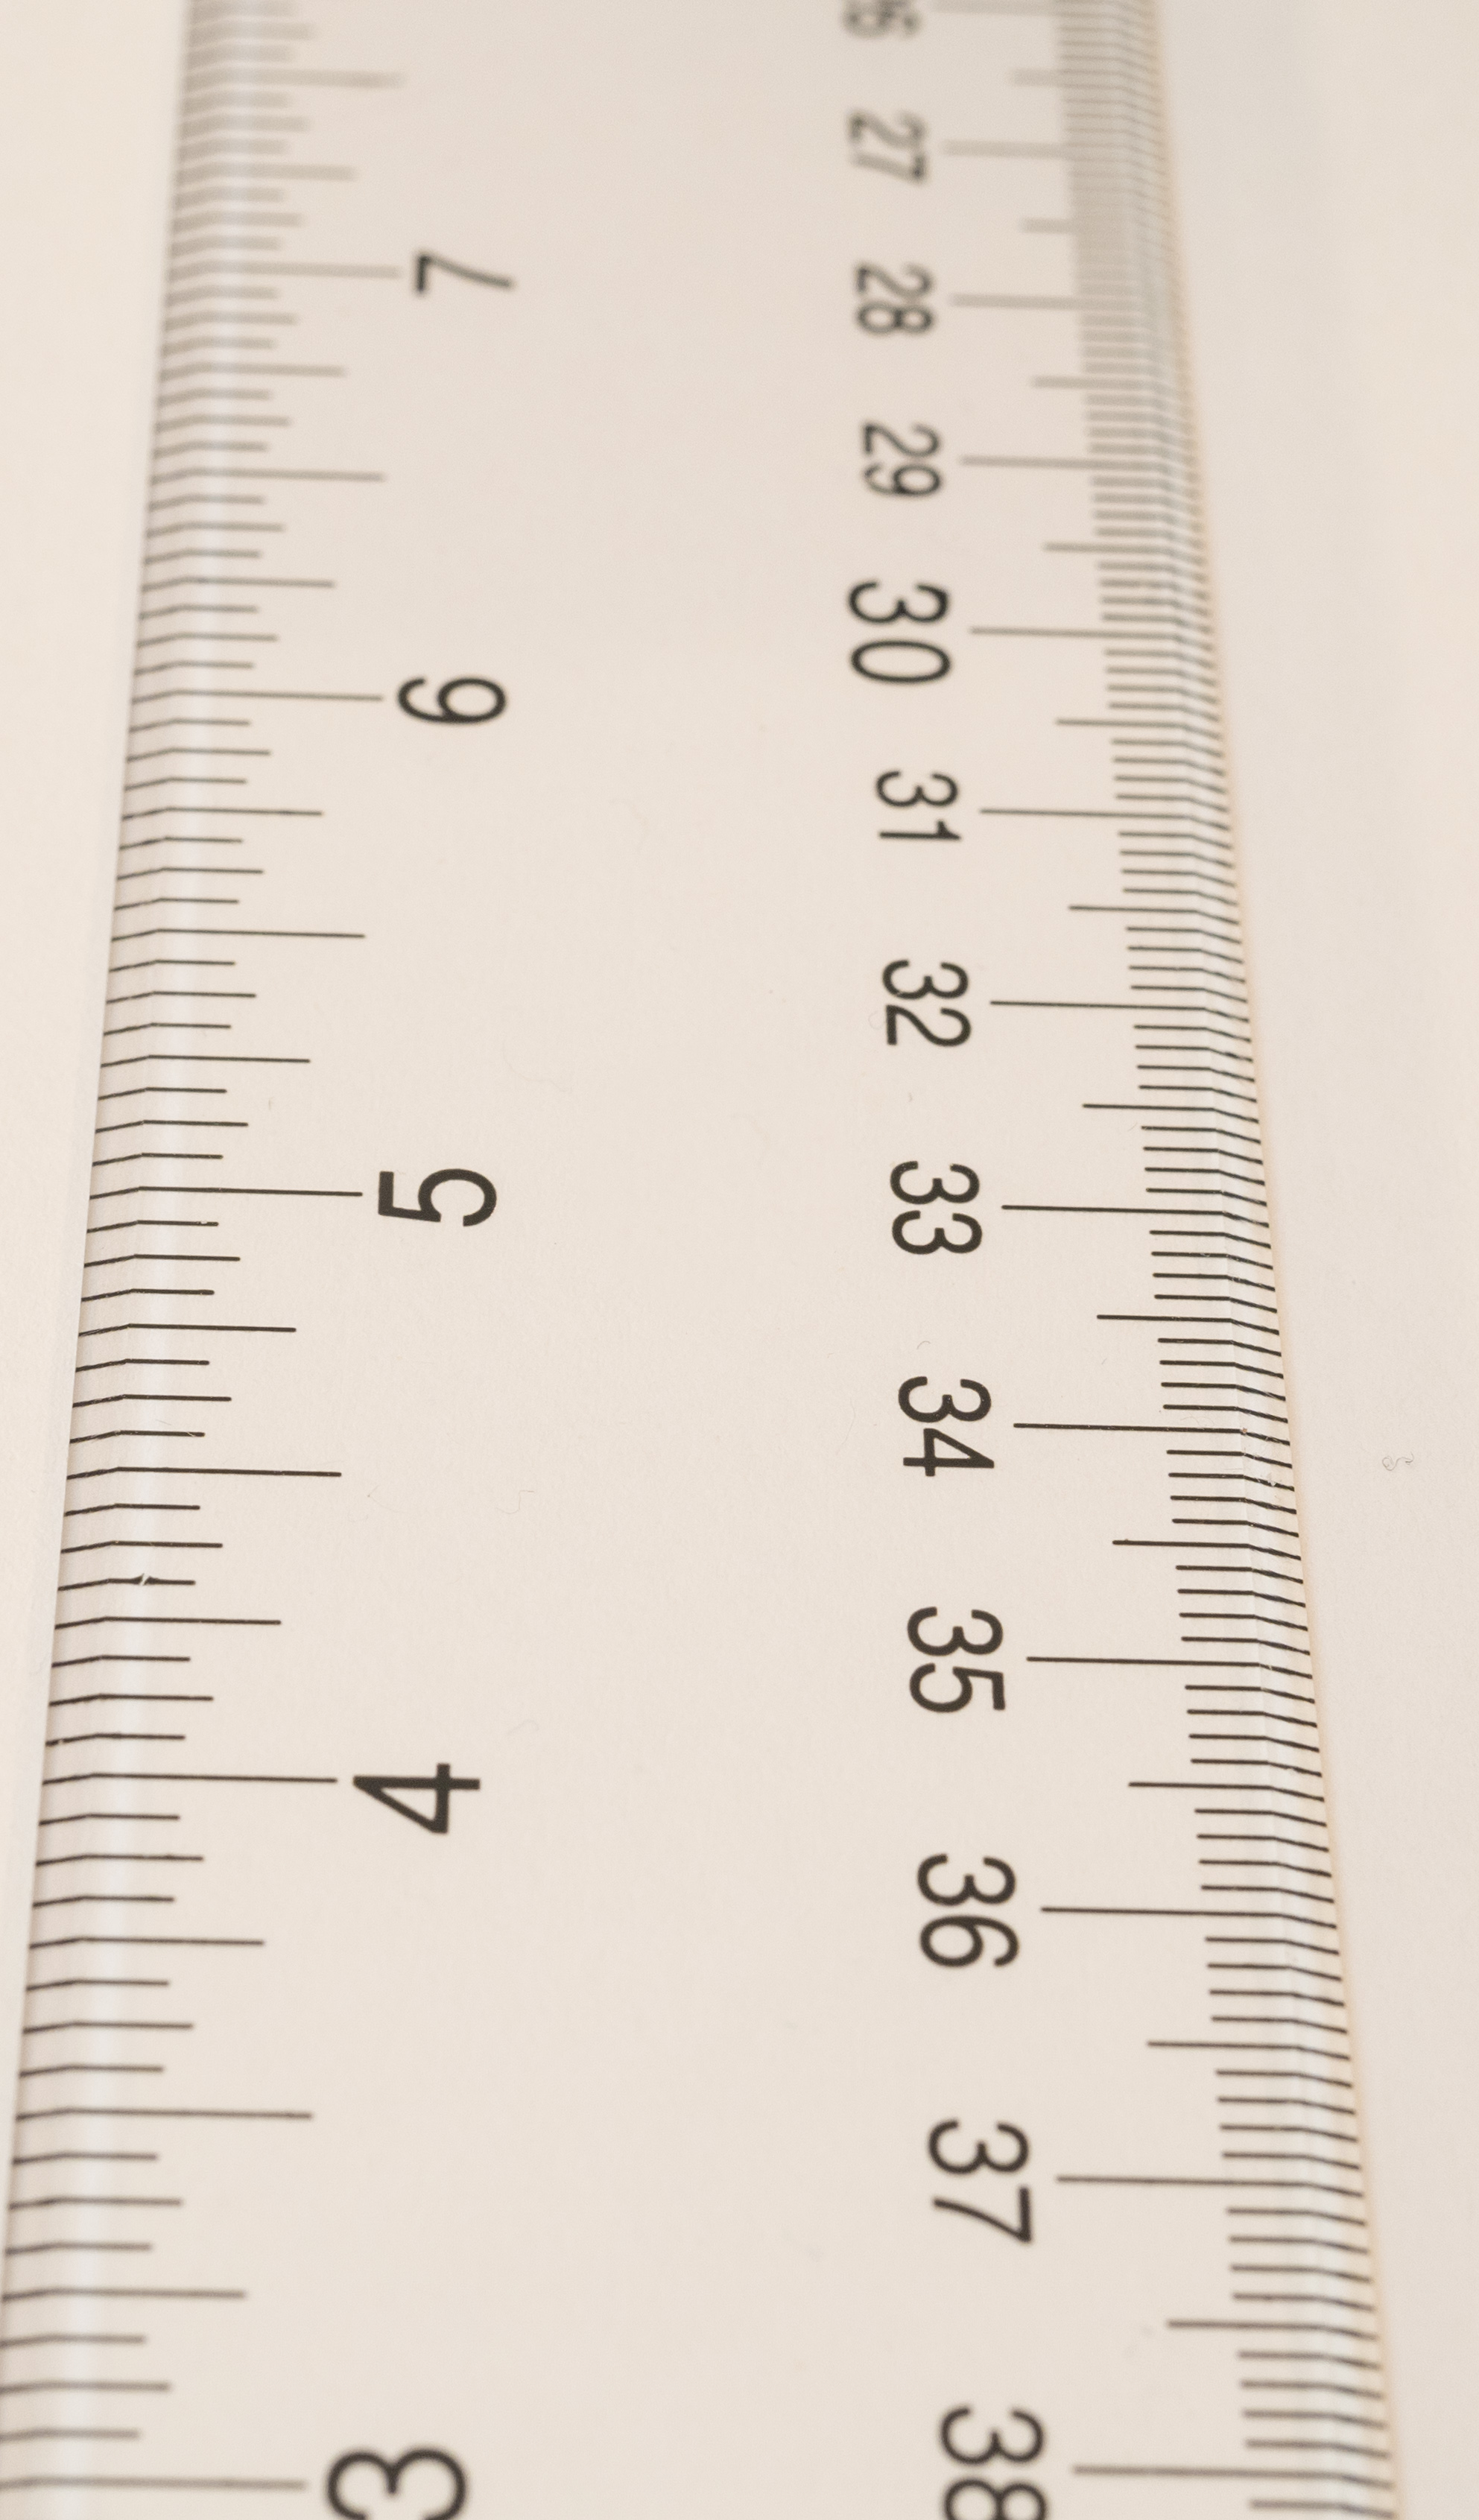
Consider this picture of a ruler:
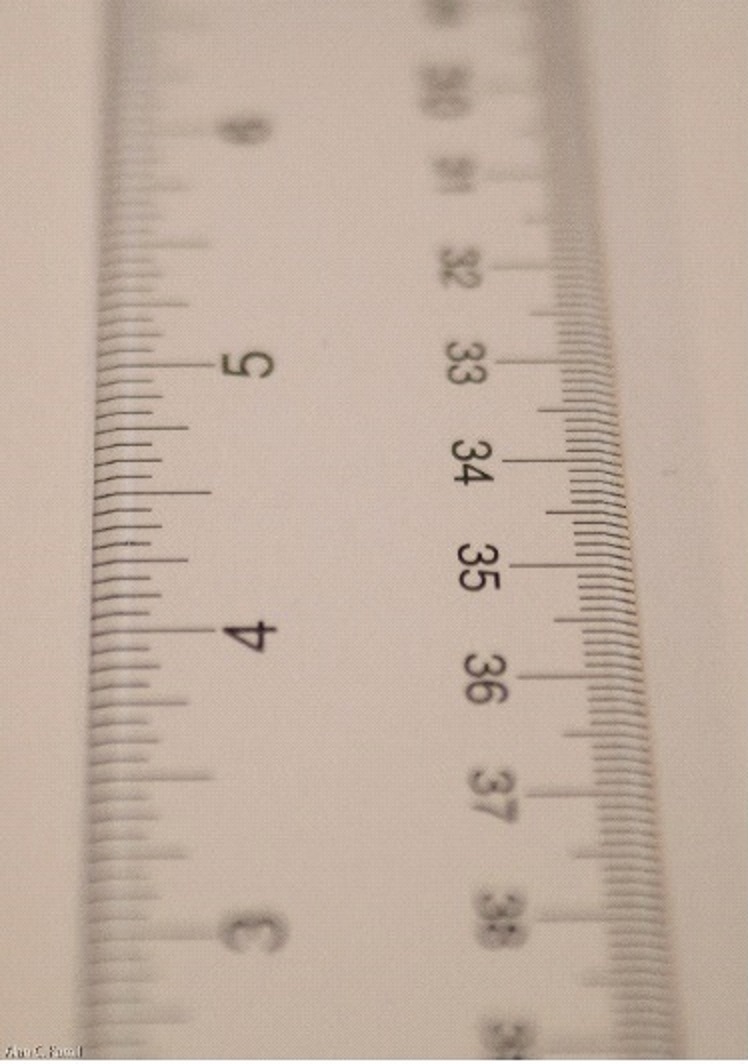
When I made the image, I focused on 34.5 cm. What is the largest cm number that appears sharp and what is the smallest? To my eye, the answers are approximately 36 and 33, yielding a DOF of 3 cm. When I made the image, I focused on 34.5 cm. What is the largest cm number that appears sharp and what is the smallest? To my eye, the answers are approximately 36 and 33, yielding a DOF of 3 cm.
The use of the word “depth” in “DOF” can be confusing. Photos are 2-dimensional, right to left (horizontal) and top to bottom (vertical), and neither photo paper nor monitor screens possess a third dimension. But, there is a third dimension to the world being photographed: distance from the camera. Therefore, there are features of our photos that are a function of that dimension. The most salient of these is usually focus, and DOF is particularly important in up close photography because DOF gets smaller and smaller the closer the camera gets to the subject. And when DOF is very narrow, slight differences in focus can have very large effects on the photograph.
Three important points to keep in mind in thinking about DOF are:
(1) Most important of all, DOF should be regarded as a tool to be used, not an obstacle or limitation. DOF is a function of many factors, including focal length and aperture as well as distance from the camera. The photographer therefore has substantial control over DOF.
(2) The judgment of sharpness is subjective, depending on interpretation of “sharp”. This judgment varies as a function of the method used to present the image, the size of the image and the acuity of the observer’s vision as well as her taste.
(3) DOF is a continuous range and does not have a sharp border.
DOF IN UP CLOSE PHOTOGRAPHY
DOF is particularly critical in up-close photography. Not only does DOF decrease as the camera gets closer to the subject, larger apertures also result in narrow DOF, and so do longer focal lengths. The effect of aperture is especially important when up close shots are taken in low light situations which require large apertures. Aperture has particularly large effects on DOF. These images were taken with the same camera (Olympus Micro OMD EM1 MK2, Micro 4/3), lens (M. ZUIKO 25mm, f1.2) and focus on the 34 cm mark. Additionally, adjustments to the shutter speed was made in an effort to keep brightness the same. Only other difference between the two images is aperture.The difference in DOF is impressive, about 1.5 cm with F/1.2 vs. 8 cm with f/8.0.

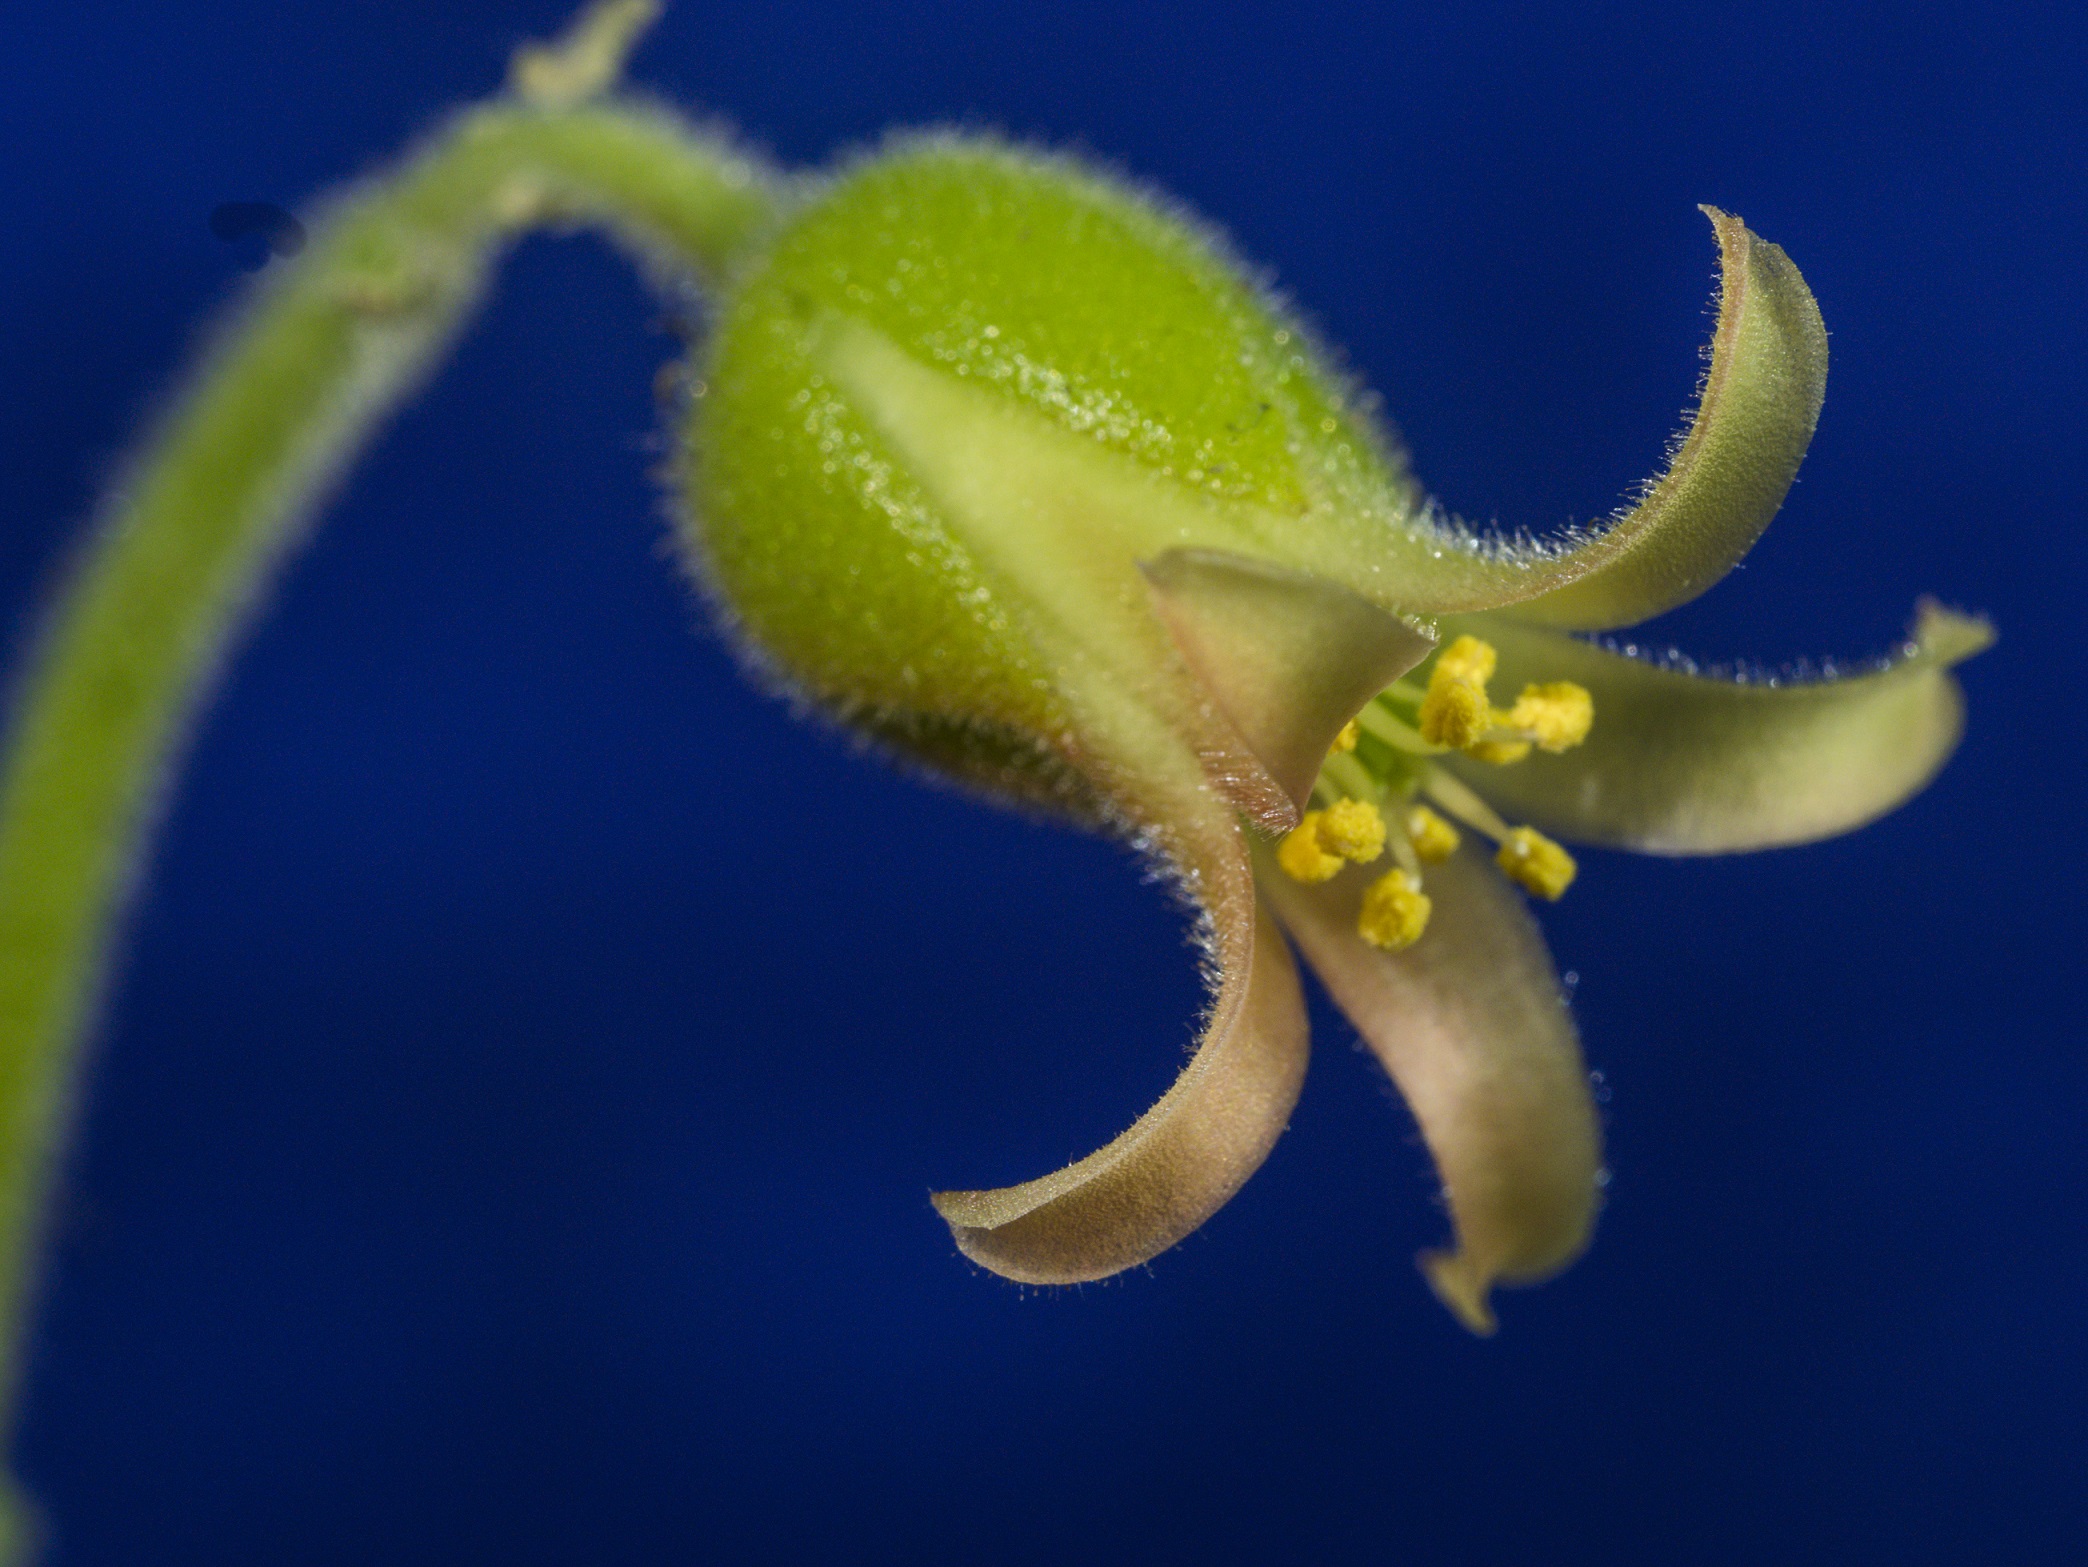
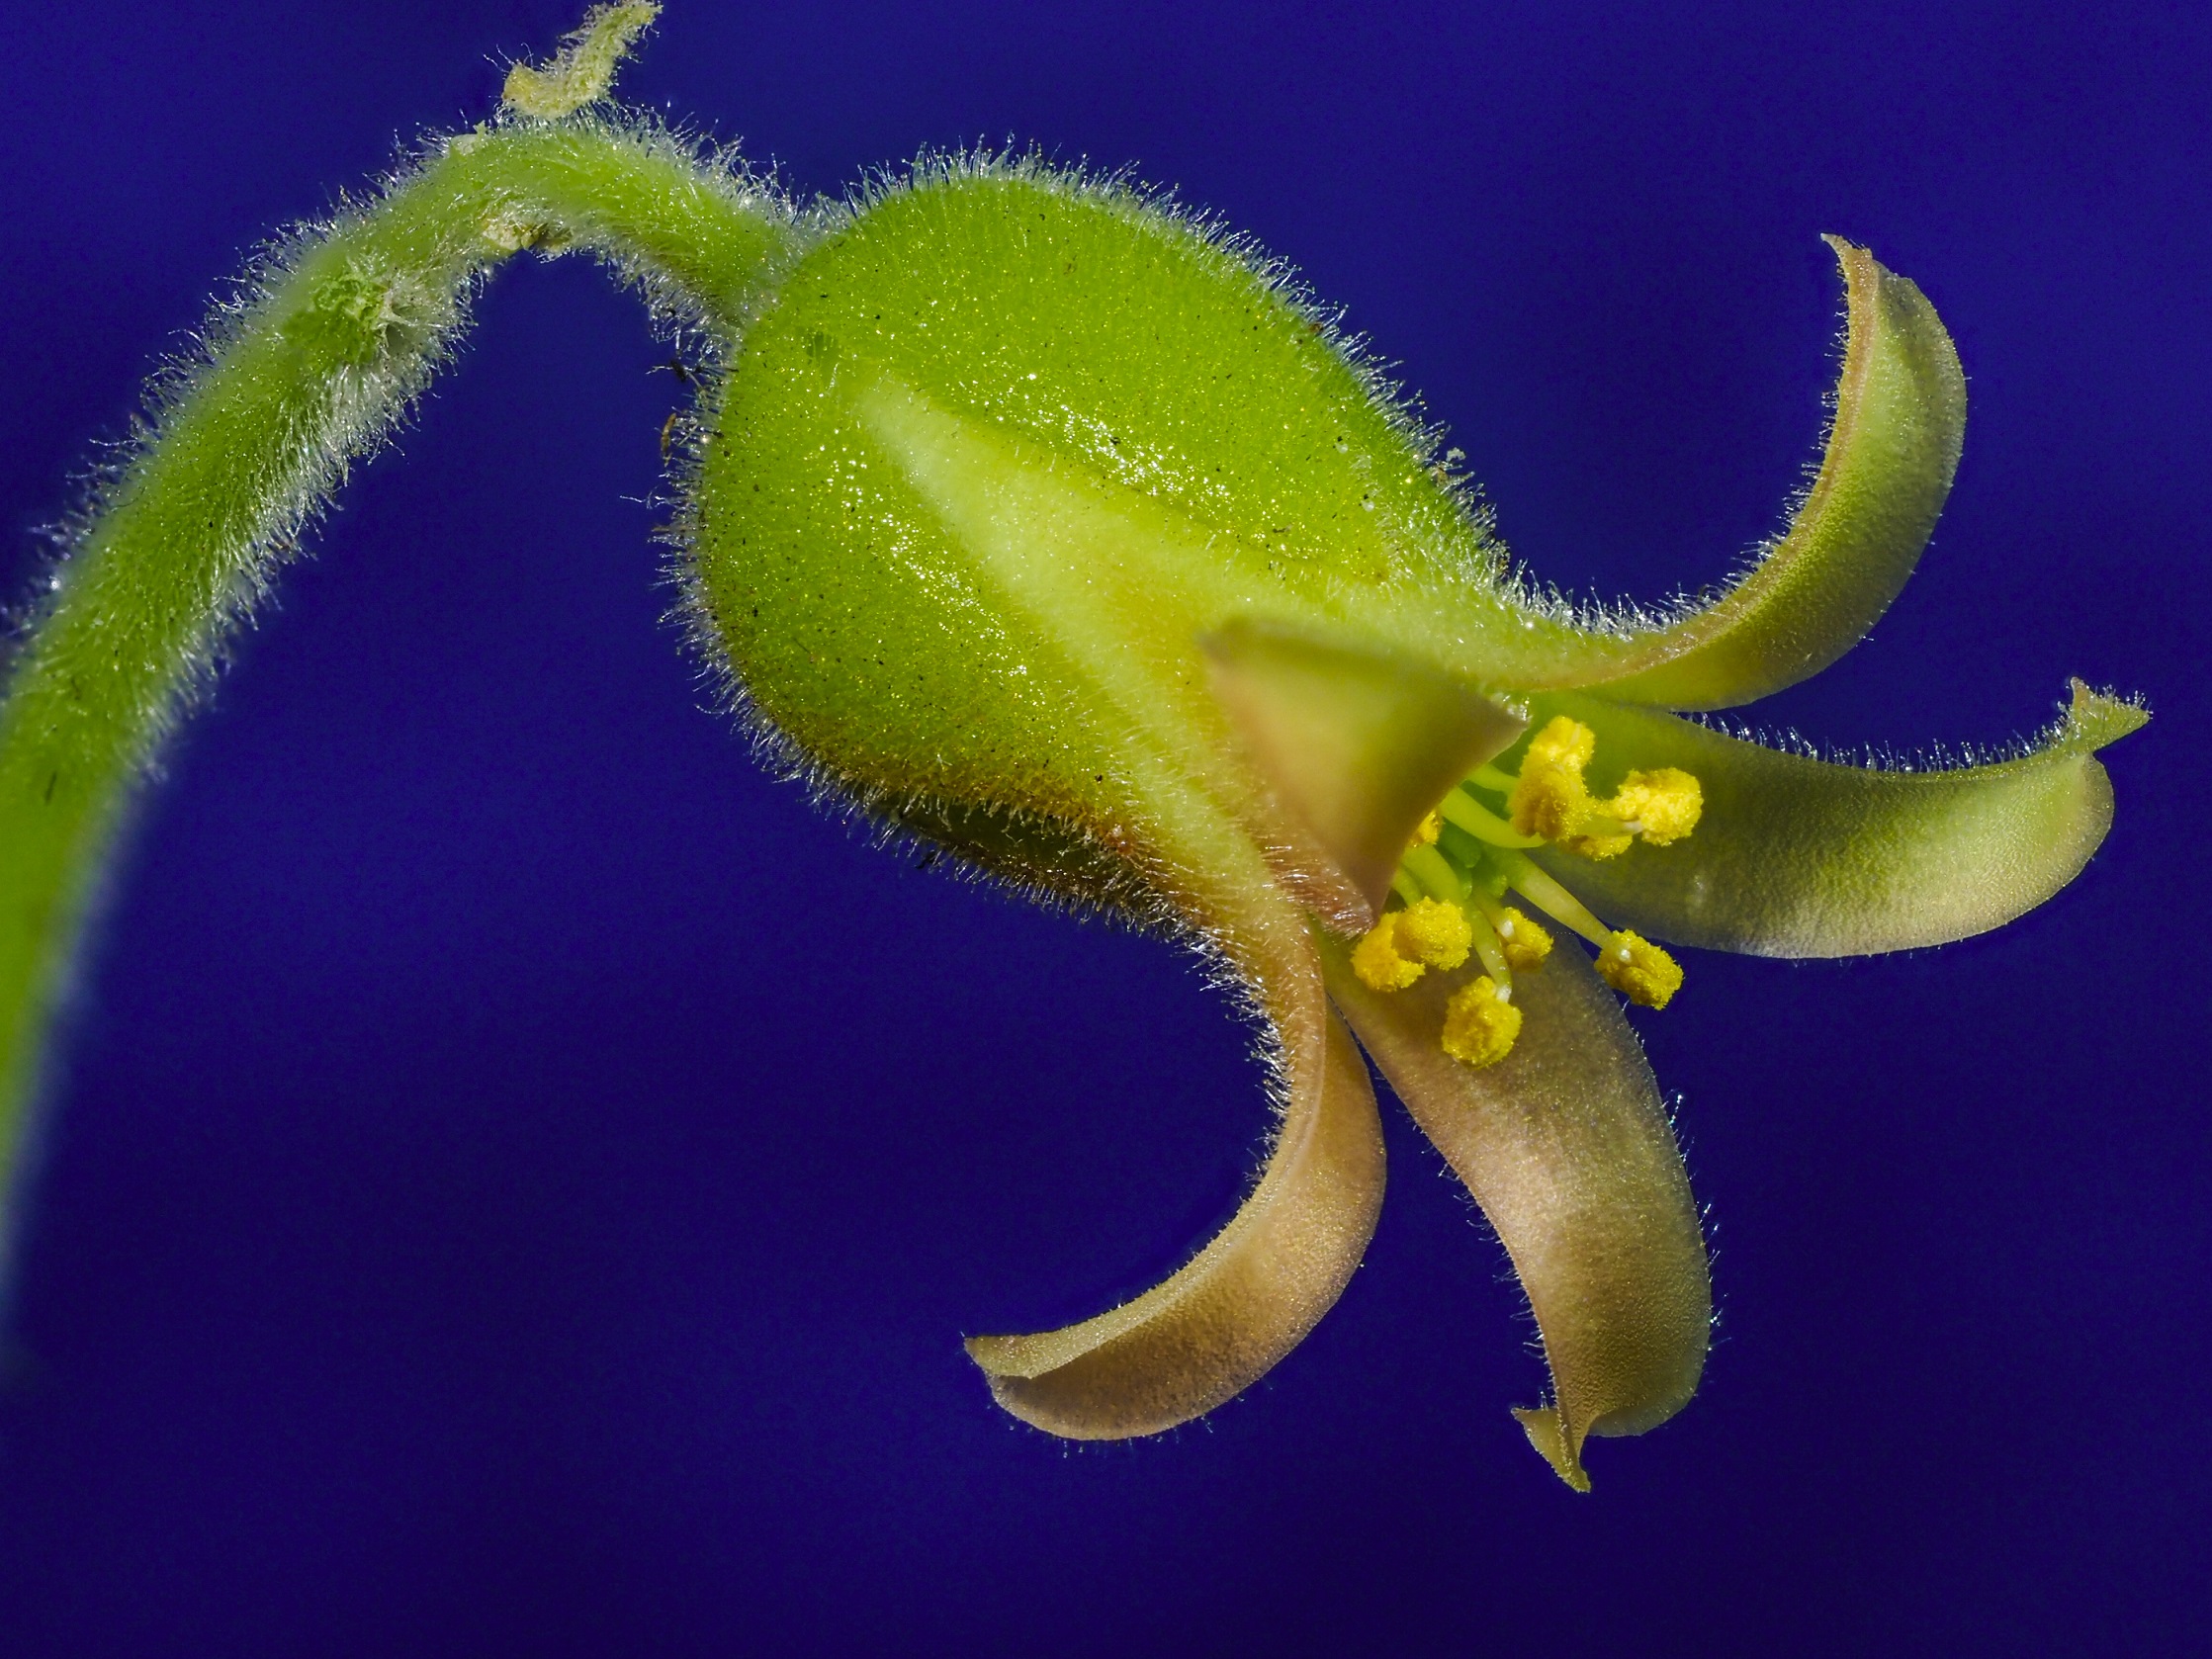
Many discussions of DOF emphasize the challenge of creating wide DOFs so that as much of the image as possible is in focus. As a result, many pictures are taken with small apertures. Consider these two images of an Aloe ‘Wrasse’ starting to bloom:

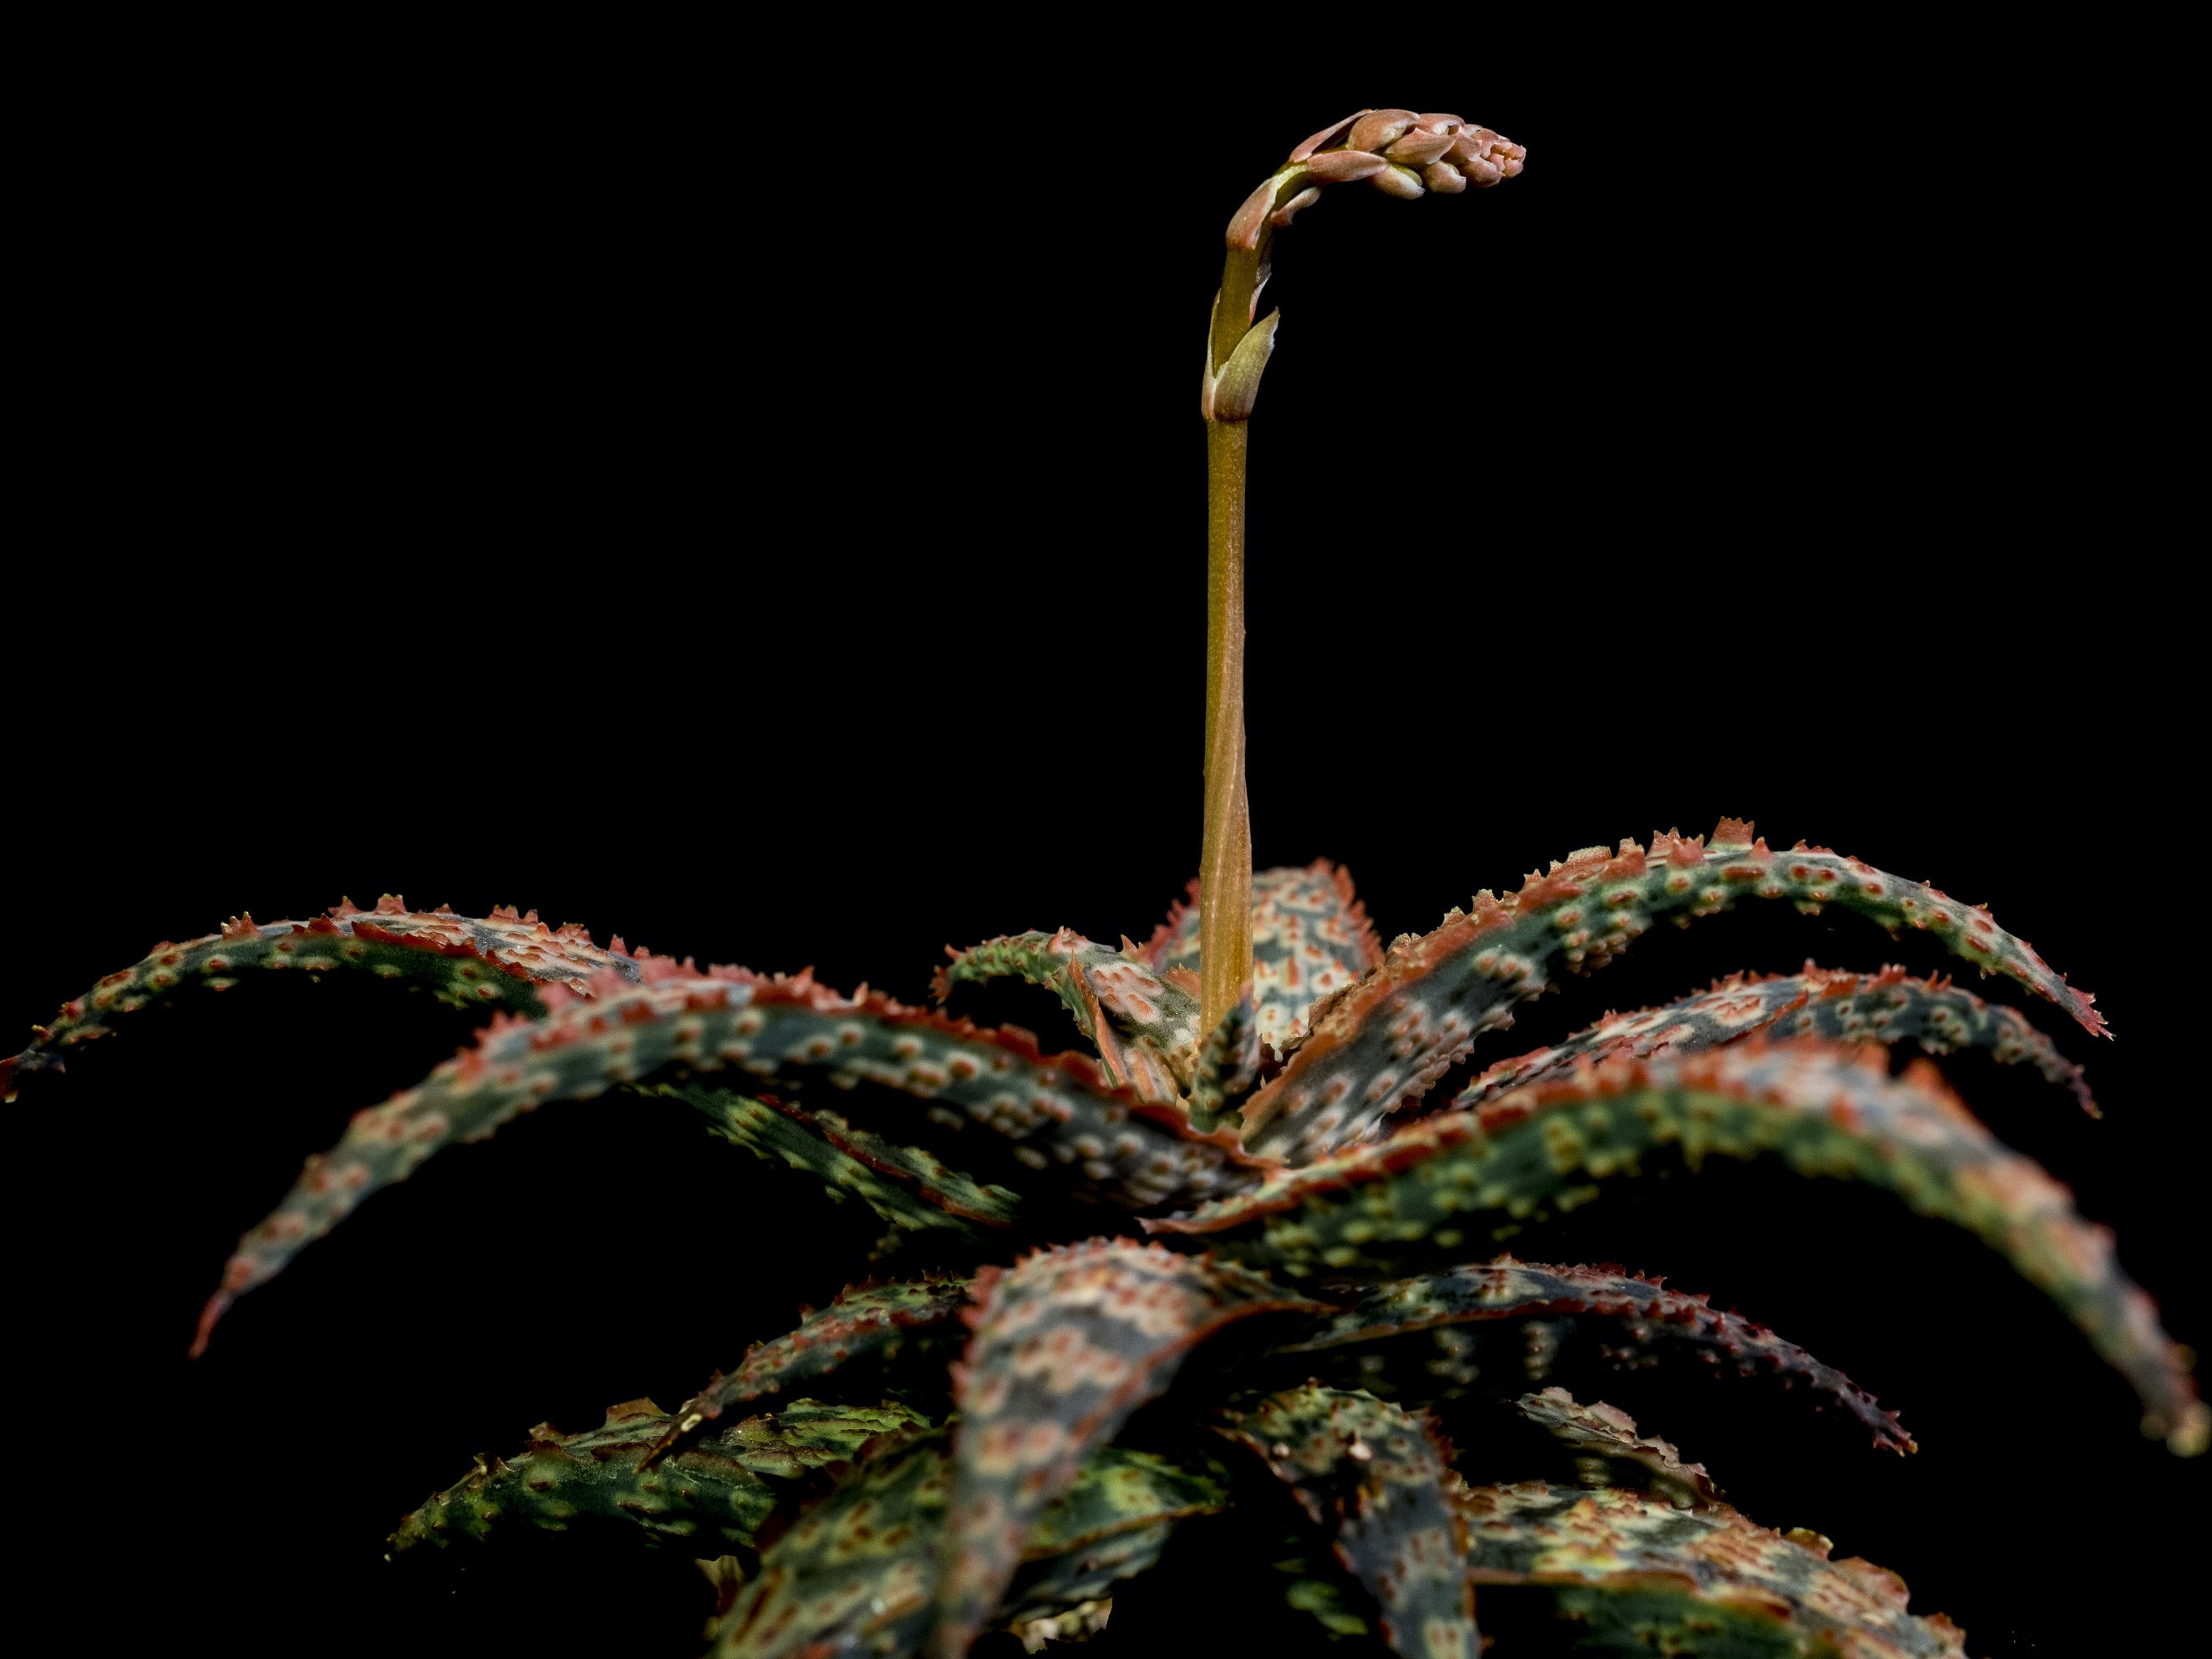
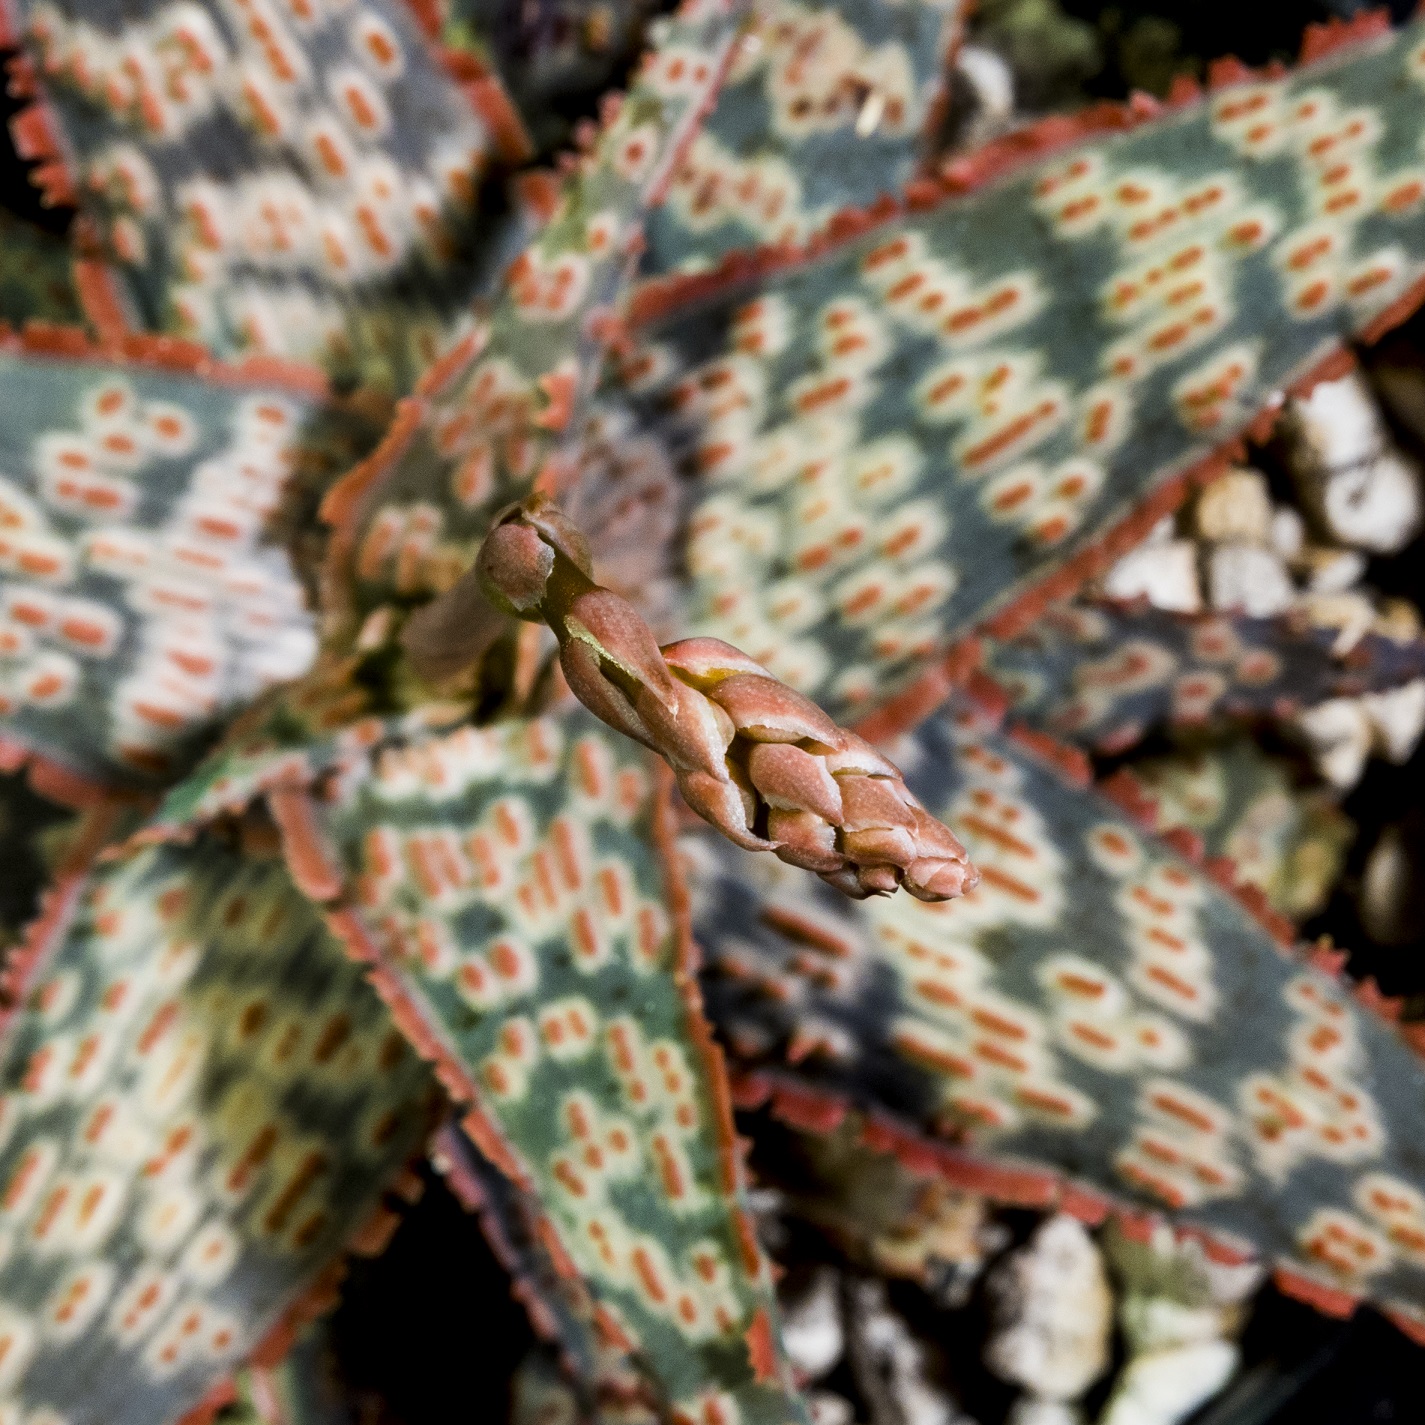
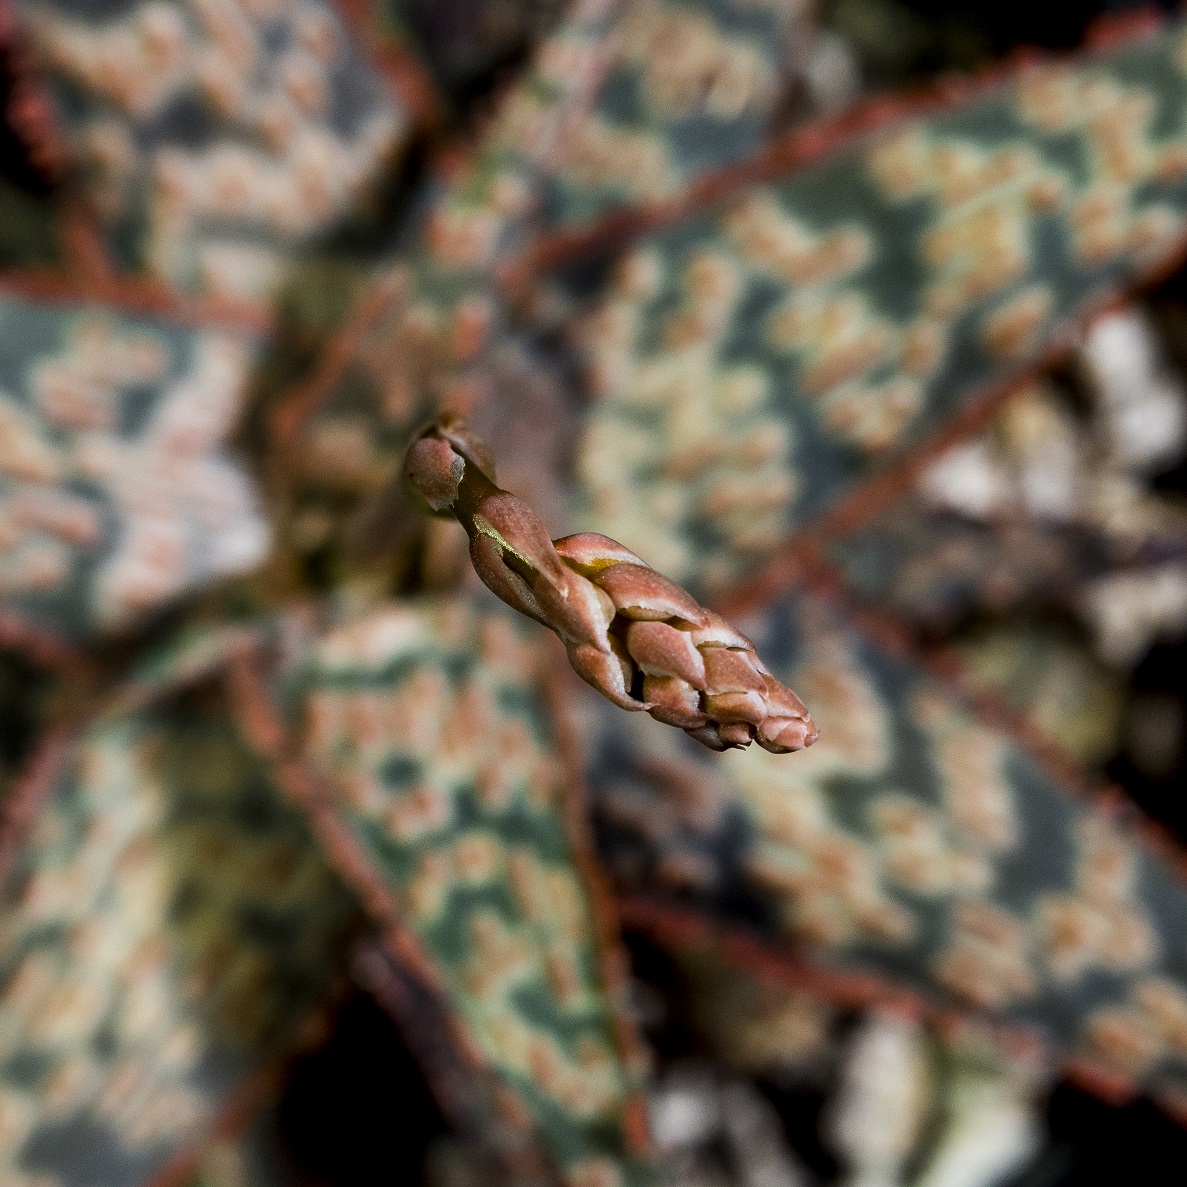
The focal point was the same in each case: the top of the stalk below the emerging flower. In the image on the bottom, shot at F/5.6, the ends of the leaves are out-of-focus, but in the image shot at F/16, more of the leaves are in focus. Most people would probably prefer F/16 and wider DOF, but shallow DOF can be a very effective tool. For example, large apertures can be used to create narrow DOF to get good visual isolation of the central feature of an image from its background. After taking the two photos above, I took three photos of the same Aloe from a top-down perspective, which provides an example of using DOF to isolate the subject from the background.
I started at F/16 which produced an image in which the critical feature virtually disappeared into the background. F/5.6 was better and the background virtually disappeared at F/1.4.

The lens I used for these images was a 25mm F1.2 M. Zuiko lens, with a 2.9X diopter. I purchased this lens, in part, because the F/1.2 maximum F-stop would allow narrow DOF as compared to a more traditional 25mm F/2.8 lens. Since my system is micro 4/3 with a sensor half the size of a full frame sensor, my 25mm lens is equivalent to a full frame 50mm lens in terms of magnification.
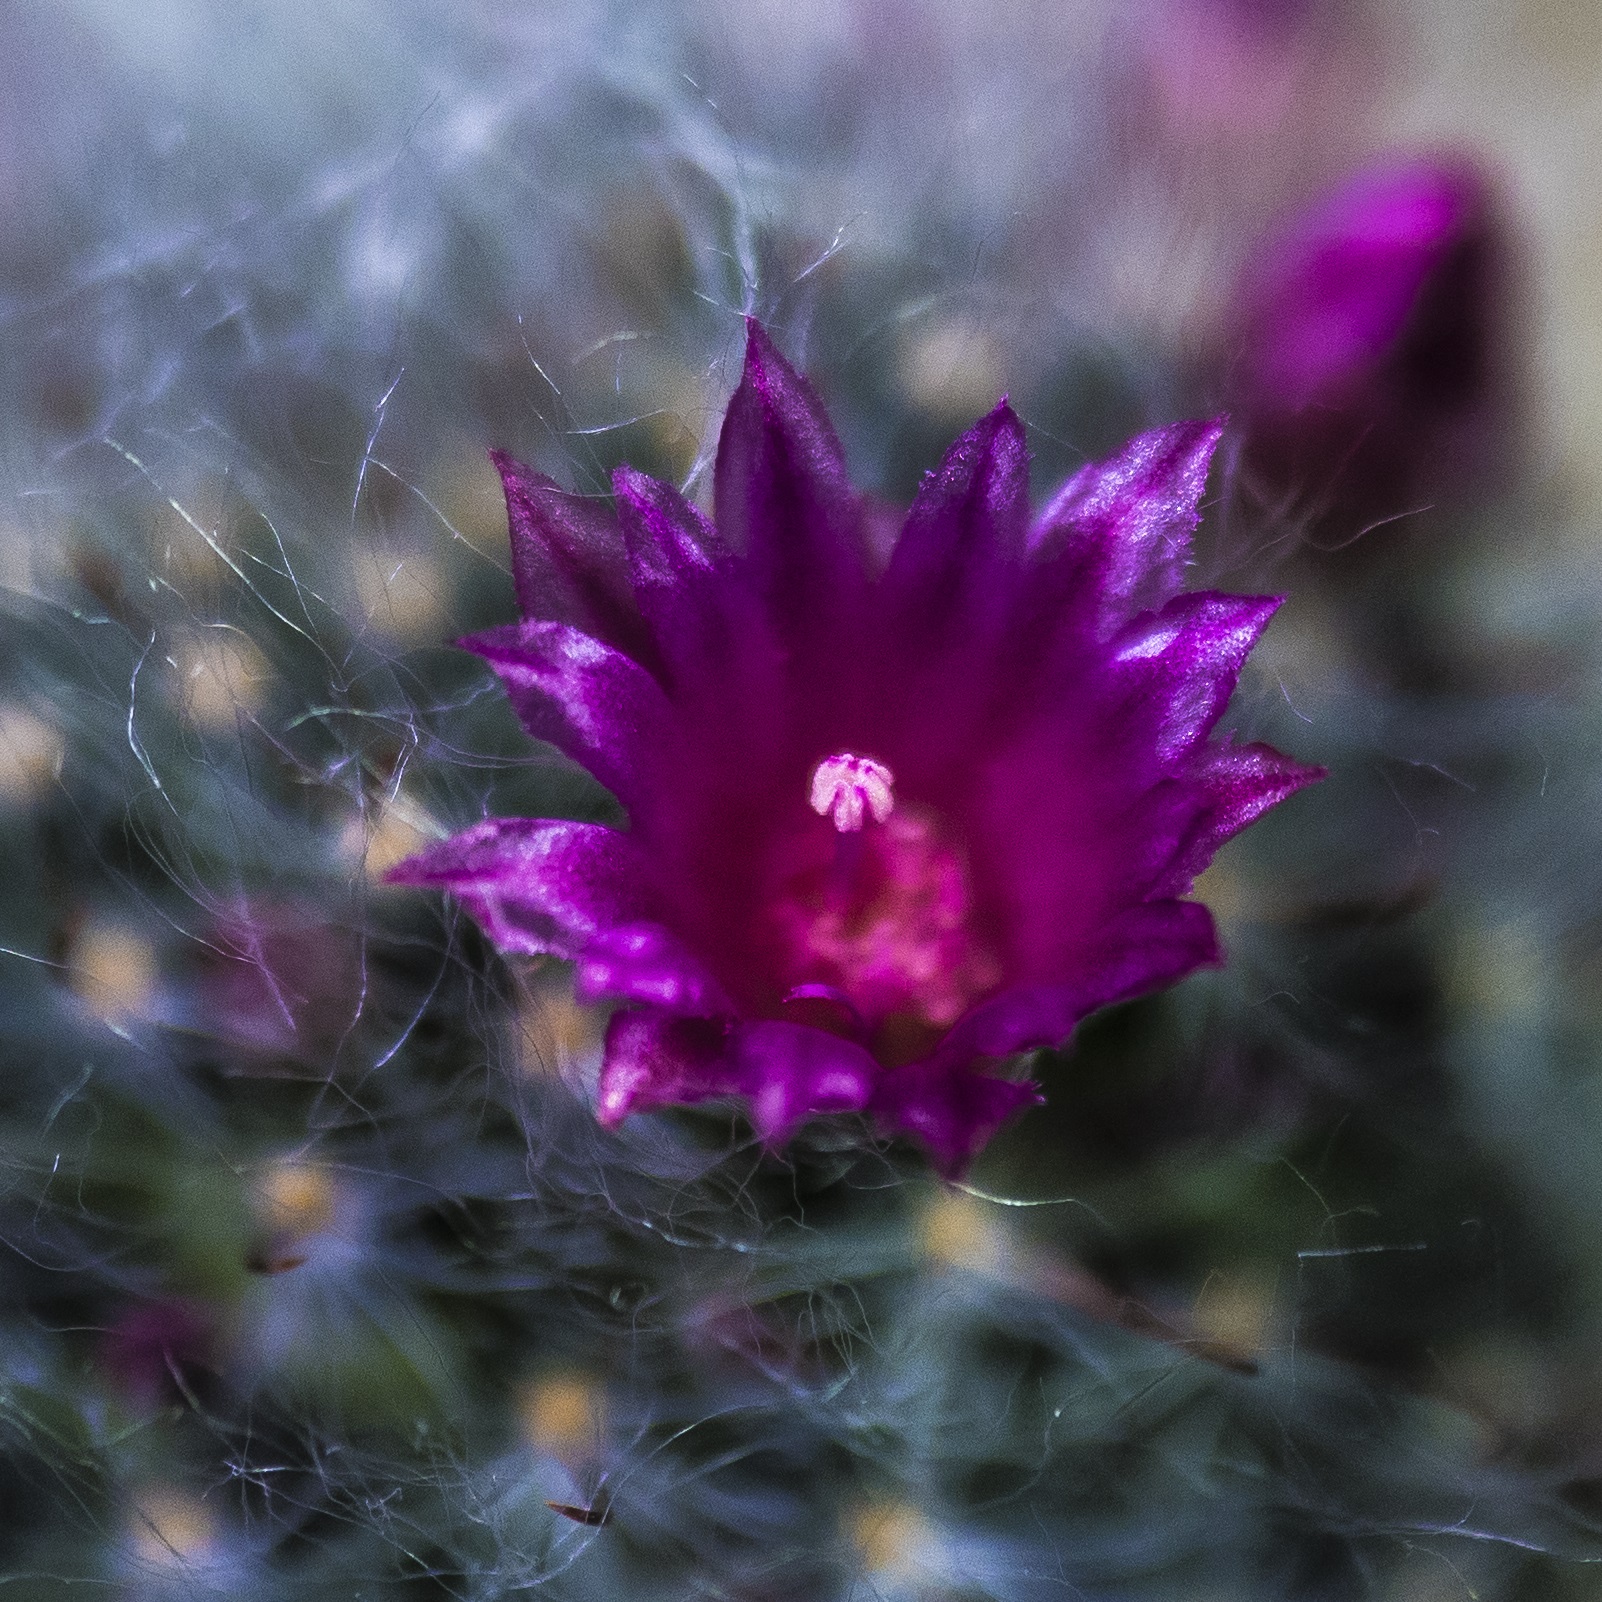
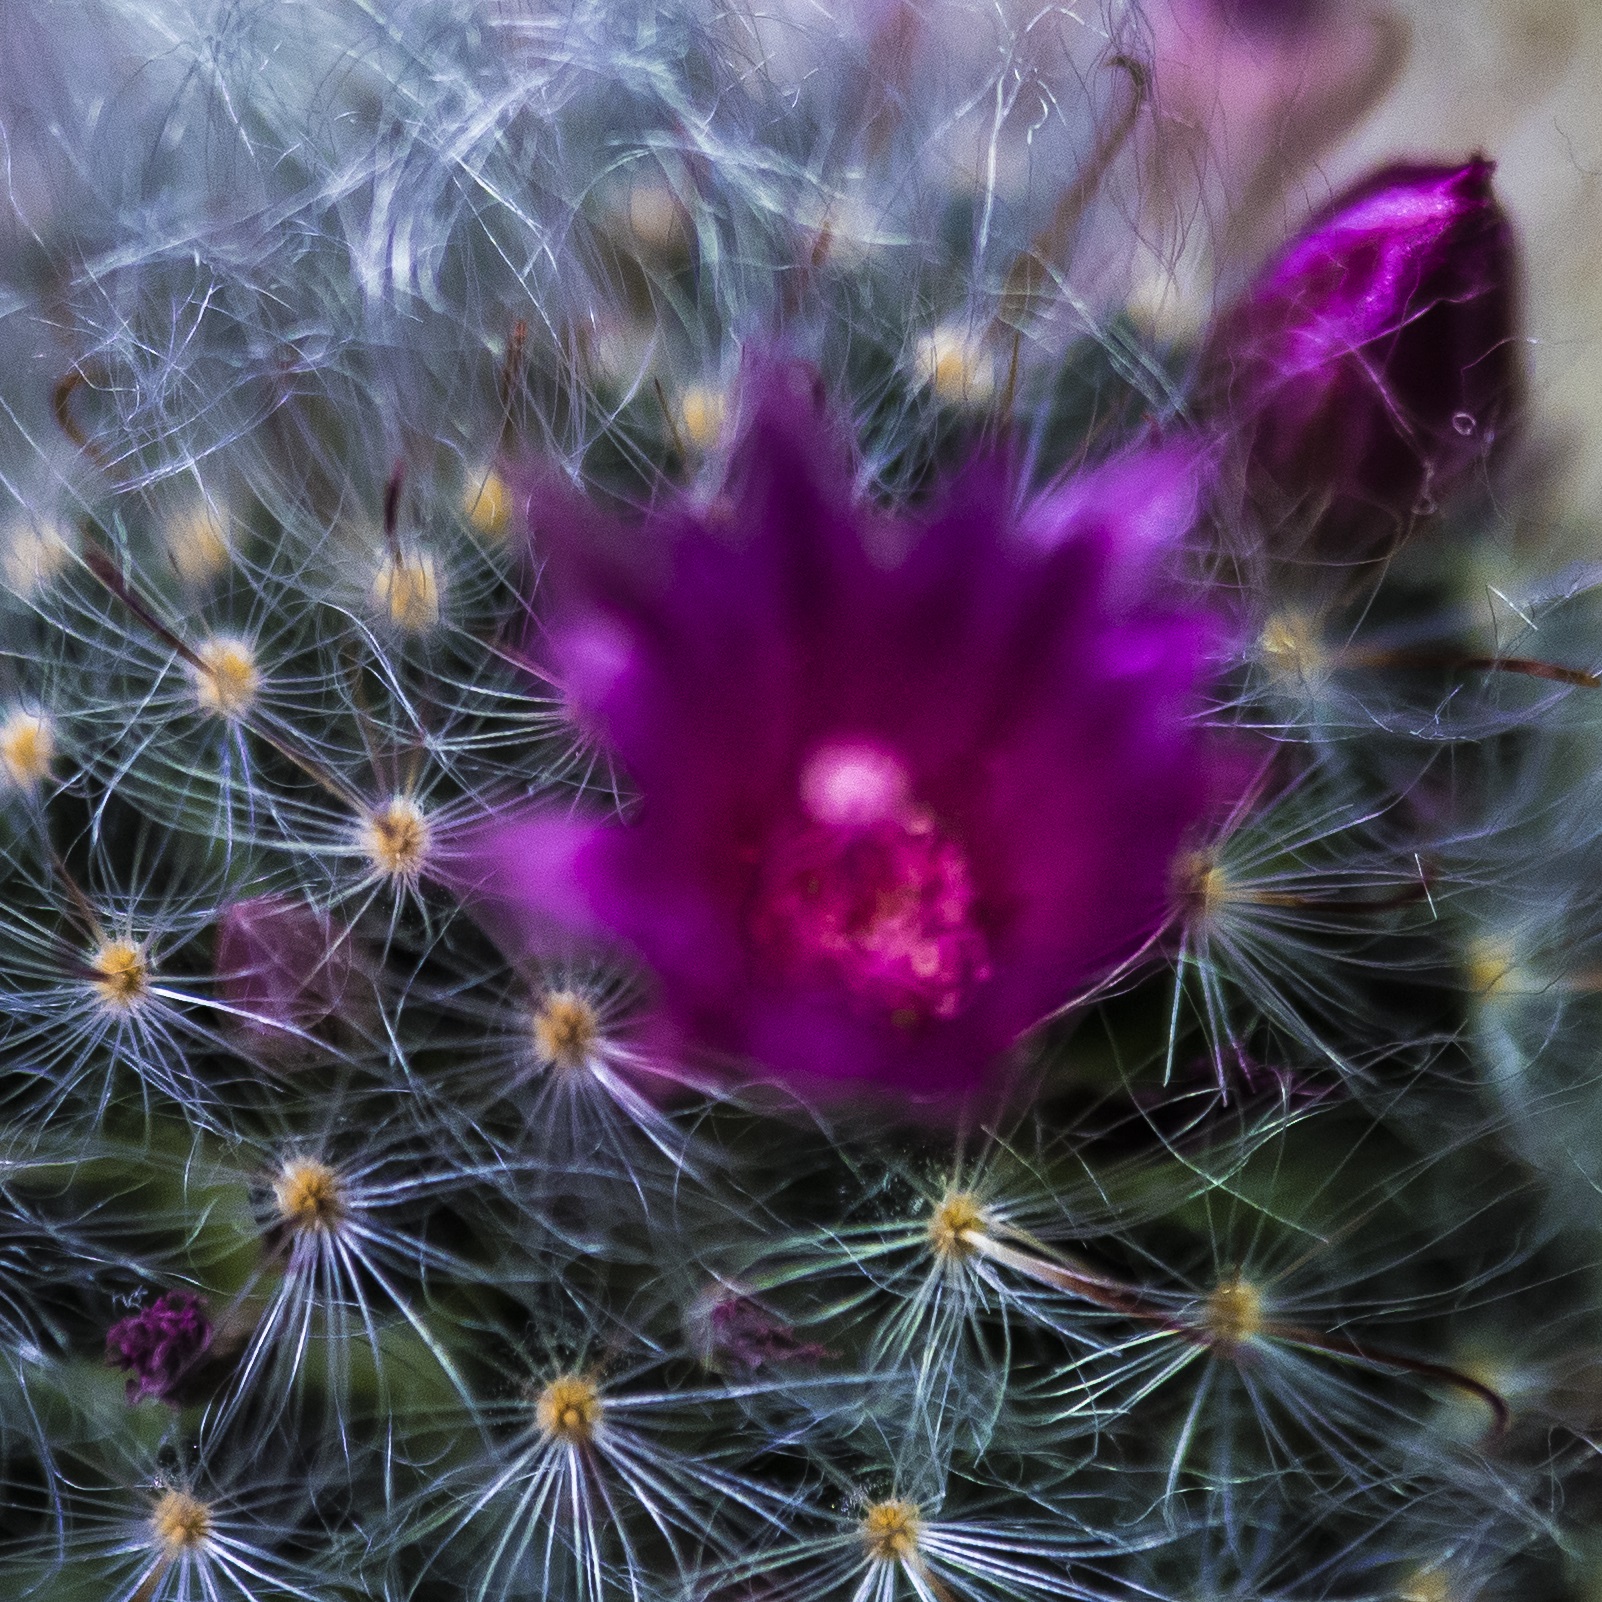
Below is an example in which tiny changes in focal point produce dramatic effects on an image in macrophotography. These three images were taken one after the other with the same camera, lens, and lighting. They were processed identically in Lightroom and they differ only in the precise location of the focal point. For the top image I focused on the top of the white stigma. For the center image, I focused on the anthers at the base of the pistil. For the bottom image, I focused on the spines of the cactus. These differences in the location of the focal point are very small, best measured in mm. But these differences in focal point result in quite different images.

Close attention must be paid to both DOF and the precise location of the focal point. This requires familiarity with the details of autofocus (AF) and manual focus (MF) and how they are controlled on your camera. Different cameras have different menus, buttons and dials, and as a result the details vary across cameras. I have tried to deal with this challenge by describing the methods in functional terms. You’ll have to figure out how to implement my recommendations on your camera. However, if you need help, let me know with the link at the end of this post. Most cameras that permit manual control of shutter speed, f/stop and ISO can implement my recommendations.
FOCUSING THE CAMERA
In order to discuss focusing our cameras, we need to be clear about what takes place during the focusing process. We usually think about focusing as a process based on a specific feature in an image. For example, in the photos above, the captions describe focus in terms of the contents of the image (“I focused on the top of the white stigma”). But we know that focus is about the distance between the camera (the sensor in the camera body, to be precise) and the focal point. Rotating the focusing ring of the lens changes the distance between the sensor and what is in focus. Suppose, for example, that the focal point is located exactly 1200 mm from the sensor. If the focus ring is initially set for 1000mm, the focal point will not be sharp. As the ring is rotated, the focal point comes into focus. When it gets to the setting of 1200mm, the focal point is in focus, and as the ring continues to be rotated to settings greater than 1200 mm, it gradually goes out of focus again. Once a specific setting of the lens focusing mechanism is chosen for the final image, there are two relevant distances:
1. The actual distance between the sensor and the focal point, in this case 1200mm. Any point in the image that is 1200 mm from the sensor will be as sharp as possible. Call this the actual focus distance, or ActFD.
2. The distance from the sensor for which the lens has been set. Call this the estimated focal distance or EstFD.
The act of focusing a camera on a specific place in a scene is a technical problem, one of choosing an estimated FD to be as precisely equal to the actual FD as possible. We are about to start a discussion of the two most often used methods that tackle the technical challenge: Manual Focus (MF) and Autofocus (AF). The challenge of getting a well-focused, sharp image is fascinating; it is also a skill that every photographer must learn to achieve their goals. Solving the technical problem is essential for producing quality images, but NOT sufficient. Keep in mind throughout this discussion that there are many other decisions related to focus that must be made that affect the aesthetic properties of images. Examples include choosing which feature(s) of the image should be in sharpest focus, where those features should be located and how wide the DOF should be. We will discuss some of these later in this series.
Using AF
In AF mode, when you depress the shutter, the camera analyzes the images many times, testing different values of EstFD, estimates which value will give the sharpest image, and takes the picture. ‘Best’ is determined by an algorithm programmed into a processor in your camera. Unfortunately, that processor cannot read your mind and the value of EstFD picked by AF will not equal ActFD, and the desired focal point will not be sharp. This is a particular problem in up close photography because the DOF is very narrow, and even a small discrepancy between EstFD and ActFD will result in a ‘mistake’ (an image very different than desired). The best solution to this problem when using AF is to give the processor as much information about the location of the focal point as possible. This reduces the odds of the AF system making such a mistake. This is accomplished using the ‘spot focus’ technique.
The AF system in most cameras has a number of distinct AF points available. Each point is a specified area within the image, each spatially separate from the others and (usually) spread throughout the image. When choosing the value of EstFD to be used, AF combines information from all of these points. But suppose there are 16 AF points, and none of them corresponds to the desired focal point. That focal point will almost certainly not be as sharp as possible, even if one of the 16 points does correspond to the desired focal point. If the AF system combines information from all 16 points to determine focus distance, it is highly unlikely that all 16 will be at the same distance from the camera. Does that mean AF is not useful when the camera and subject are very close and DOF is tight?
Not necessarily. Many cameras allow the photographer to select how many AF points will be used by the AF system. For macrophotography (and in many other situations), the best AF strategy is to use just one of these points, the “spot” in “spot focusing”. If the selected AF point encompasses the desired focal point, then the AF is including it in the analysis. This does not completely solve the problem. In cases where the focal point is smaller than the AF point, the target may still not be optimally focused. Some cameras allow control of the size of the spot as well as the number. With AF and tight DOF, the best strategy is to use just one AF point that is as small as possible. If your camera doesn’t offer selection of a single, reasonably small sized AF point, your best option will be manual focus. Before discussing manual focus, however, there is another very useful technique in spot focusing, separating the act of focusing the camera from the act of taking the picture.
Depressing the shutter button is usually a three-stage process, providing a convenient way to separate AF from shutter activation. Step 1 is pressing the shutter halfway. This activates AF which takes the information from the AF point(s) and sets the lens at what it determines is the best value of EstFD. Step 2 is adjusting the position of the camera so the overall composition of the image is what you want. As long as you hold the shutter button halfway, the setting of the EstFD will not change. Once you have got the overall image as you want it, then complete the process with Step 3: depressing the shutter button all the way down and taking the picture. Step 2 is critical to producing good images: it provides the freedom to put the focal point of the image anywhere within the frame.
With some practice, this becomes second nature and an essential tool in your bag of photographer’s tricks in many contexts beyond macrophotography.
Using MF
This is the preferred method of most close up/macro photographers whenever the subject is stationary or moving slowly. Turn off AF and use the focus ring on the lens (or equivalent manual method) to focus the image just the way you want it. This gives complete control of the camera’s focus and how the image is composed without fussing with AF focus points – and it is very precise. Two recently developed processes have made MF even more precise and are being built into many cameras. They are usually called “Magnify” and” Peak Detection”. When either of these is activated it comes on automatically when the focus ring is rotated.
“Magnify”, as its name implies, enlarges the image in the viewer so that the details can be seen more clearly. This is very helpful in achieving precise focus, but it comes at some cost. While the image is magnified the camera viewer must remain the same size. As a result only part of the enlarged image can be seen in the viewer at any time. Some very quick button pressing is often needed to get the critical part of the image in the viewer. And since the magnified view is necessarily larger than the viewer, it cannot provide an overall view of the image.
“Peak detection” analyzes the image to determine which parts are in focus given the EstFD specified by the focusing ring. As EstFD changes as the ring is rotated, the highlights in the viewer also move so that highlighted areas are the ones in sharpest focus. With this, it is much easier to get the focus where you want it by manually rotating the focus ring (or equivalent process) and watching where the highlights are. This provides a strong indicator of DOF as well as the focal point itself.
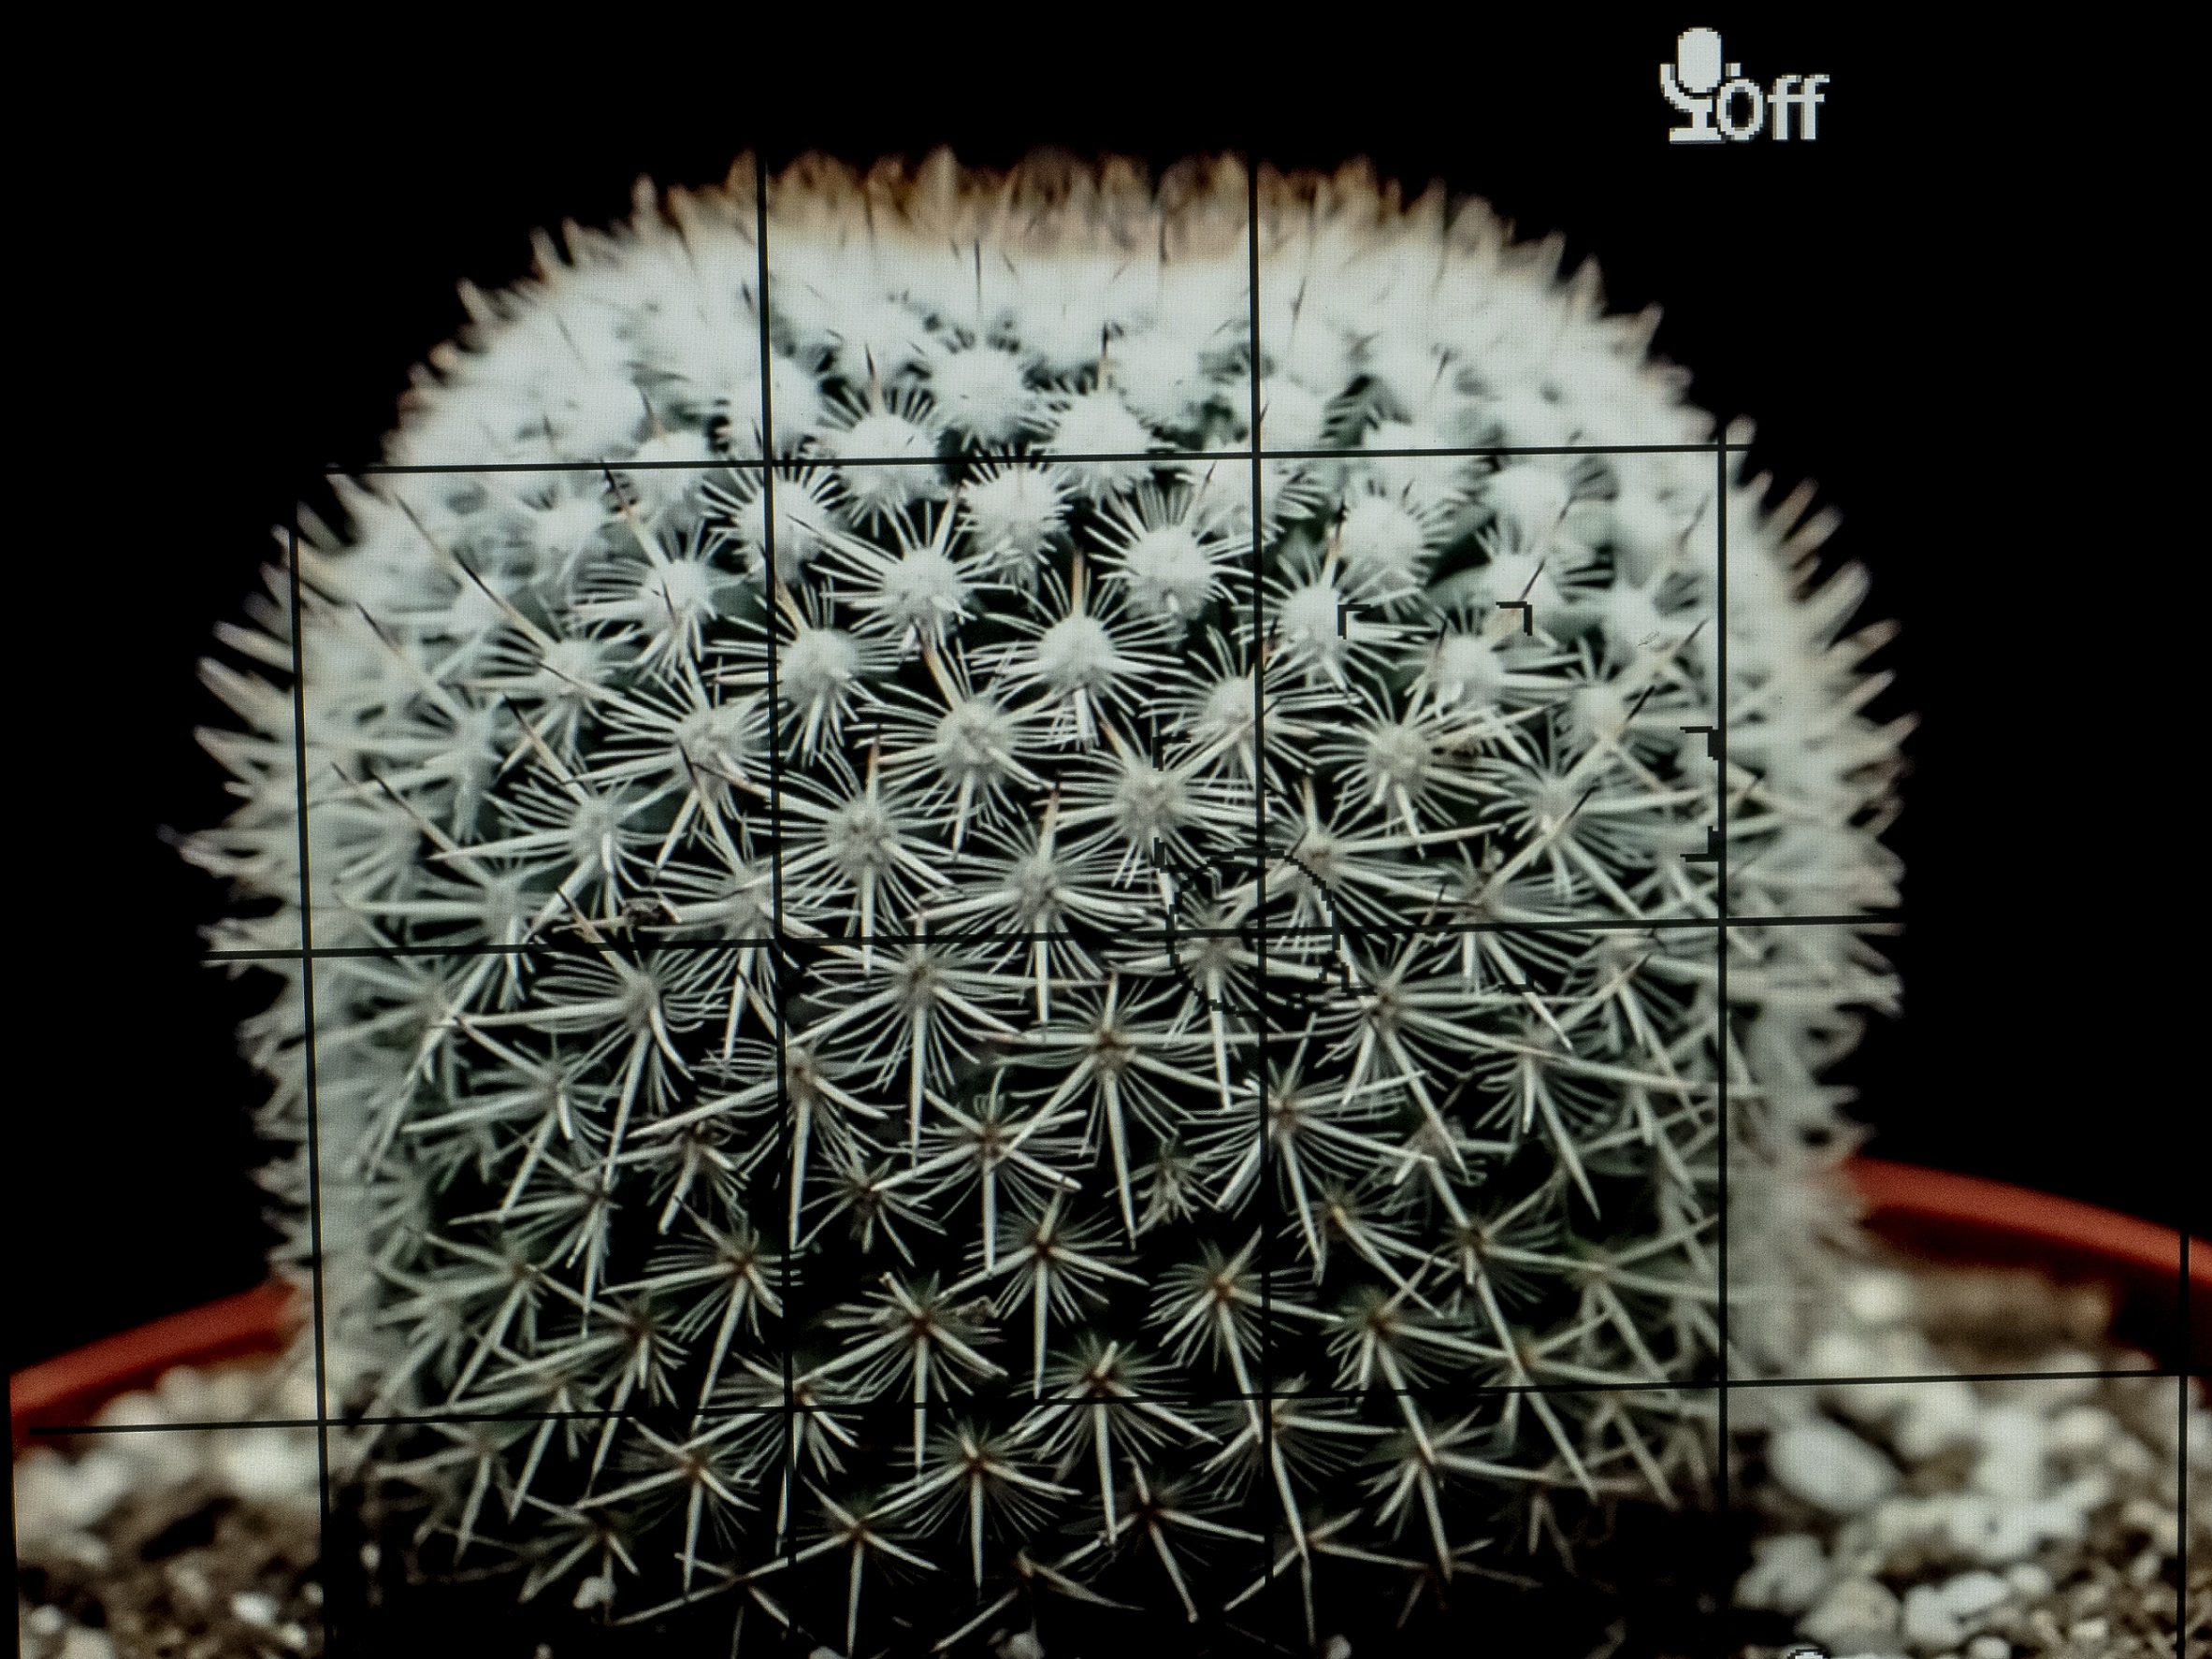
Here are 4 images of a Notocactus magnificus that show how this works on my Olympus.
This first image shows the cactus with peak detection turned off.
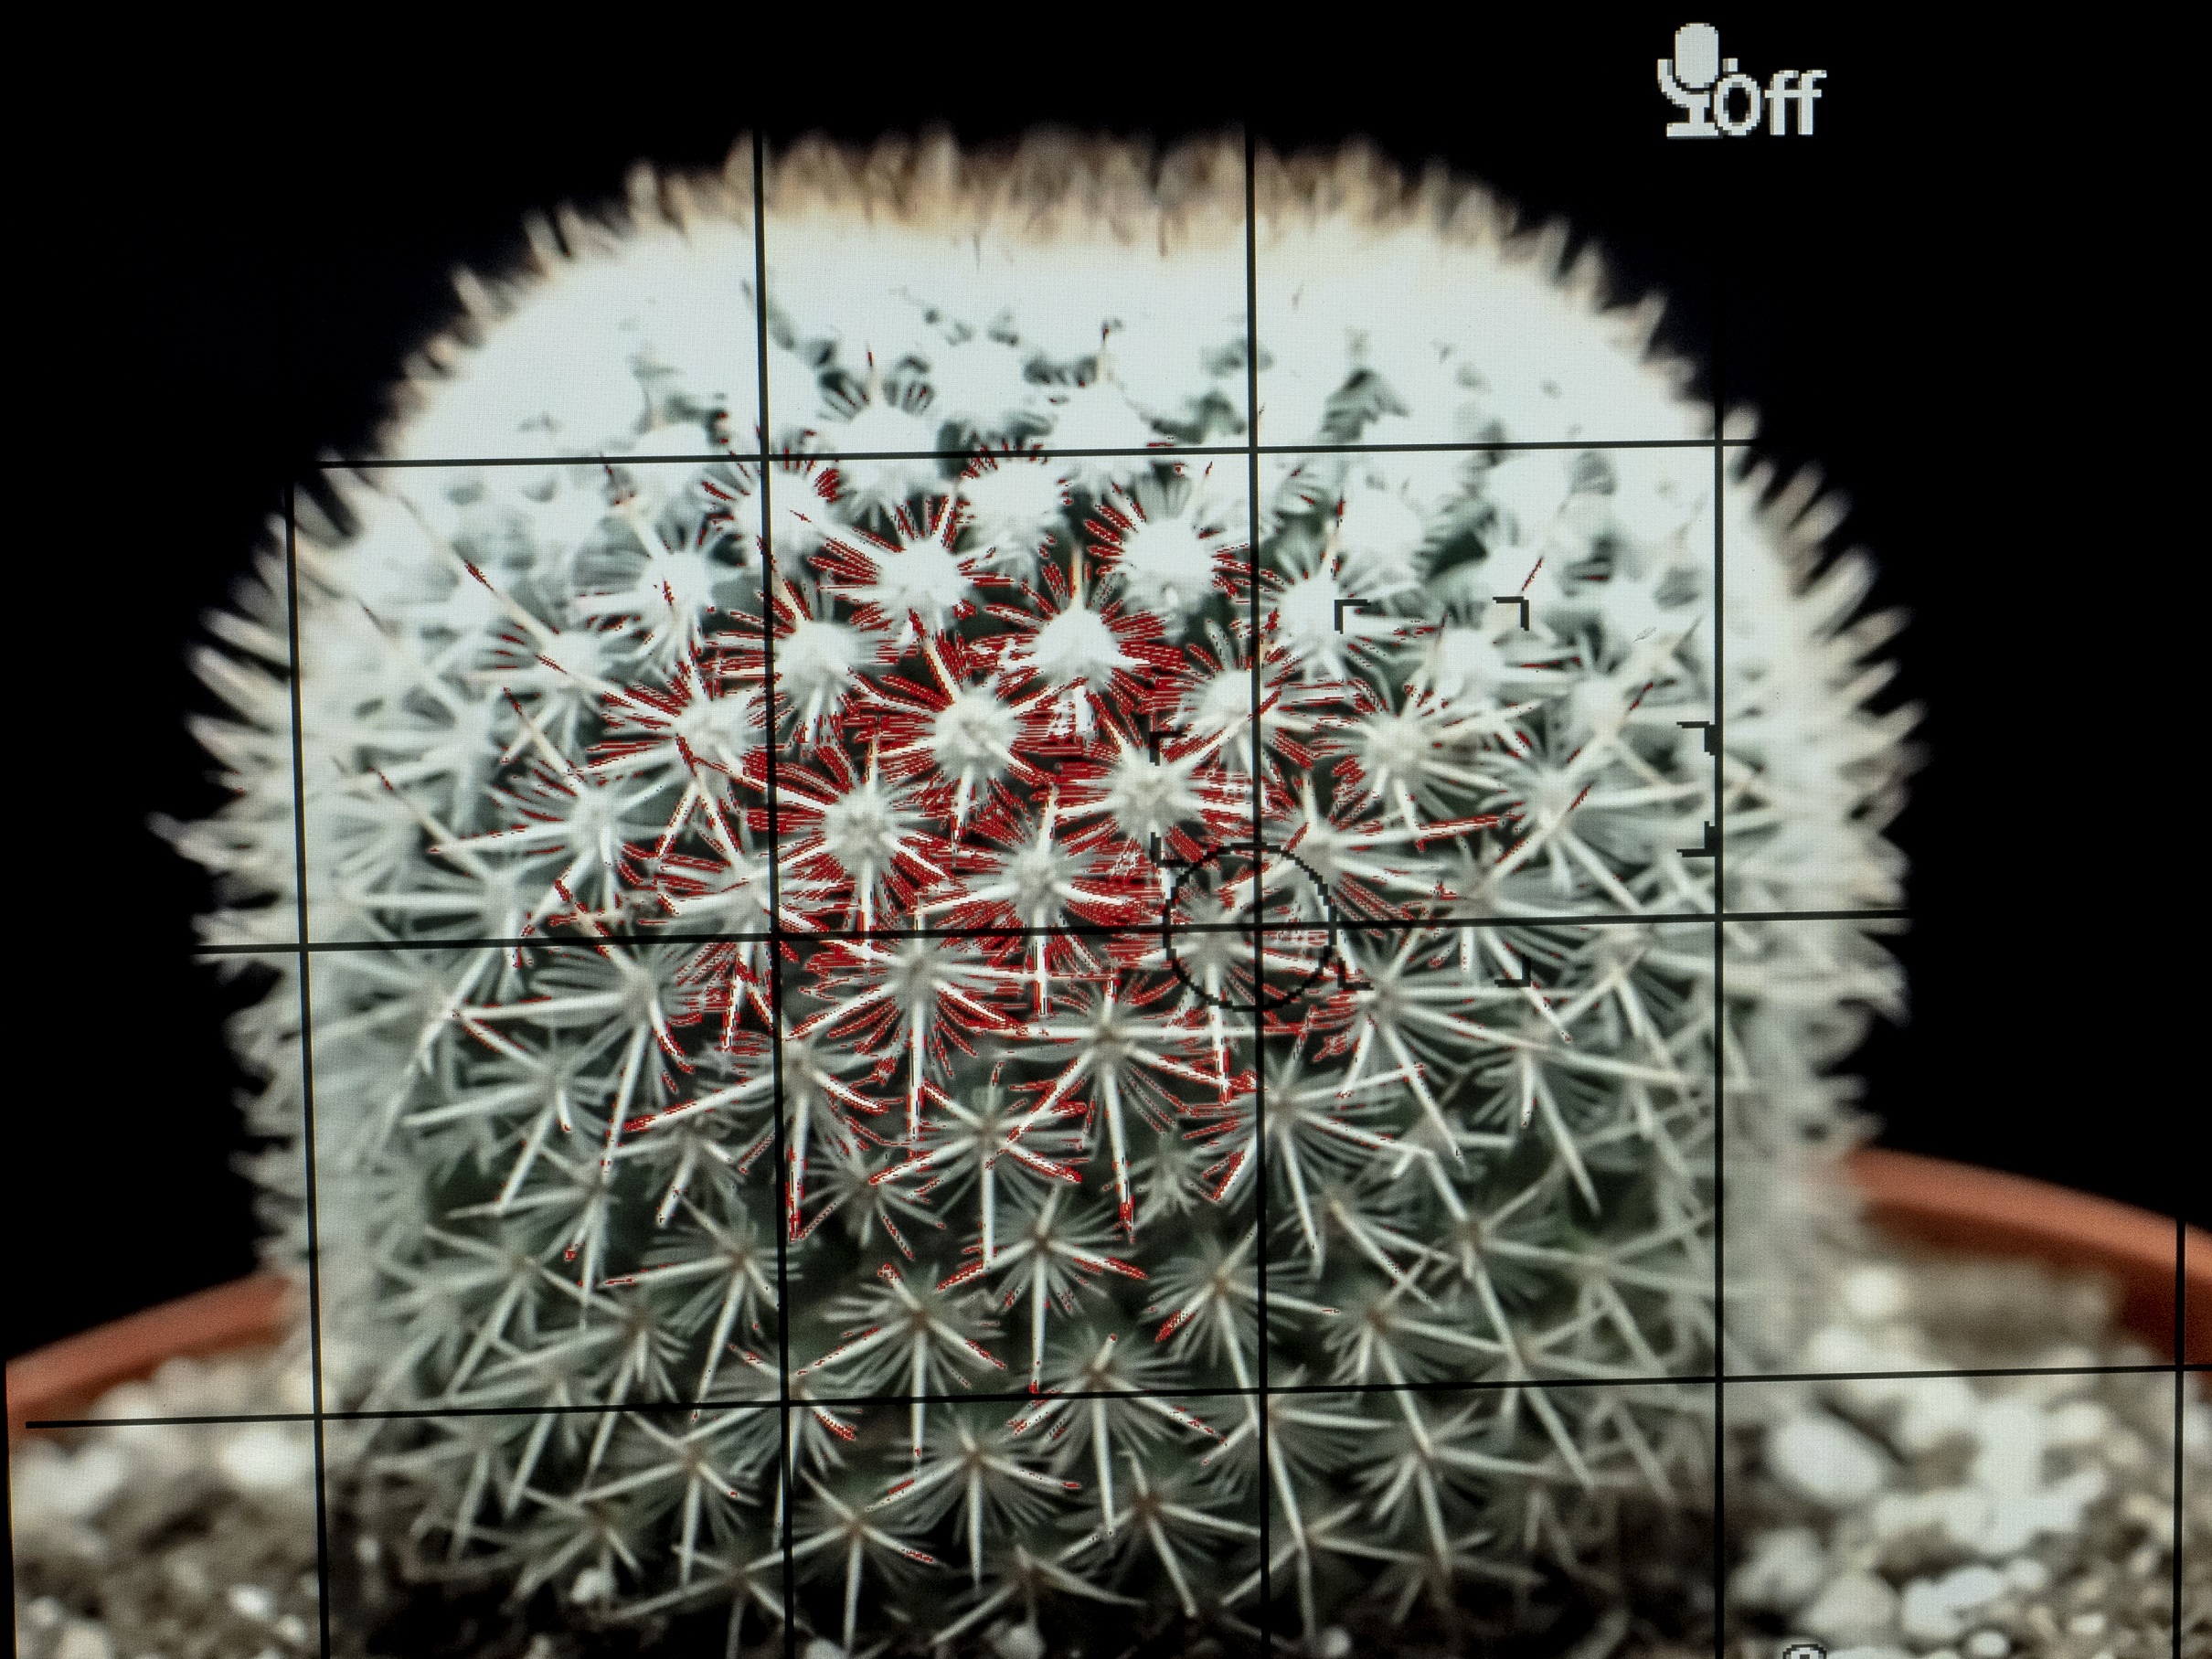
The next three images show how the peaking (indicated in red) changed as focus was moved from the front of the image to the back.
In the first image with peaking turned on, the location of the red highlights shows that the focal point is at the front of the cactus, where EstFD is equal to the distance to the part of the cactus closest to the camera sensor.
In the next image, the focal point is further back (EstFD is larger in this photo than in the previous one). Note the shape of the area defined by the red highlights due to the balloon-like shape of the cactus, bulging outward towards the camera.

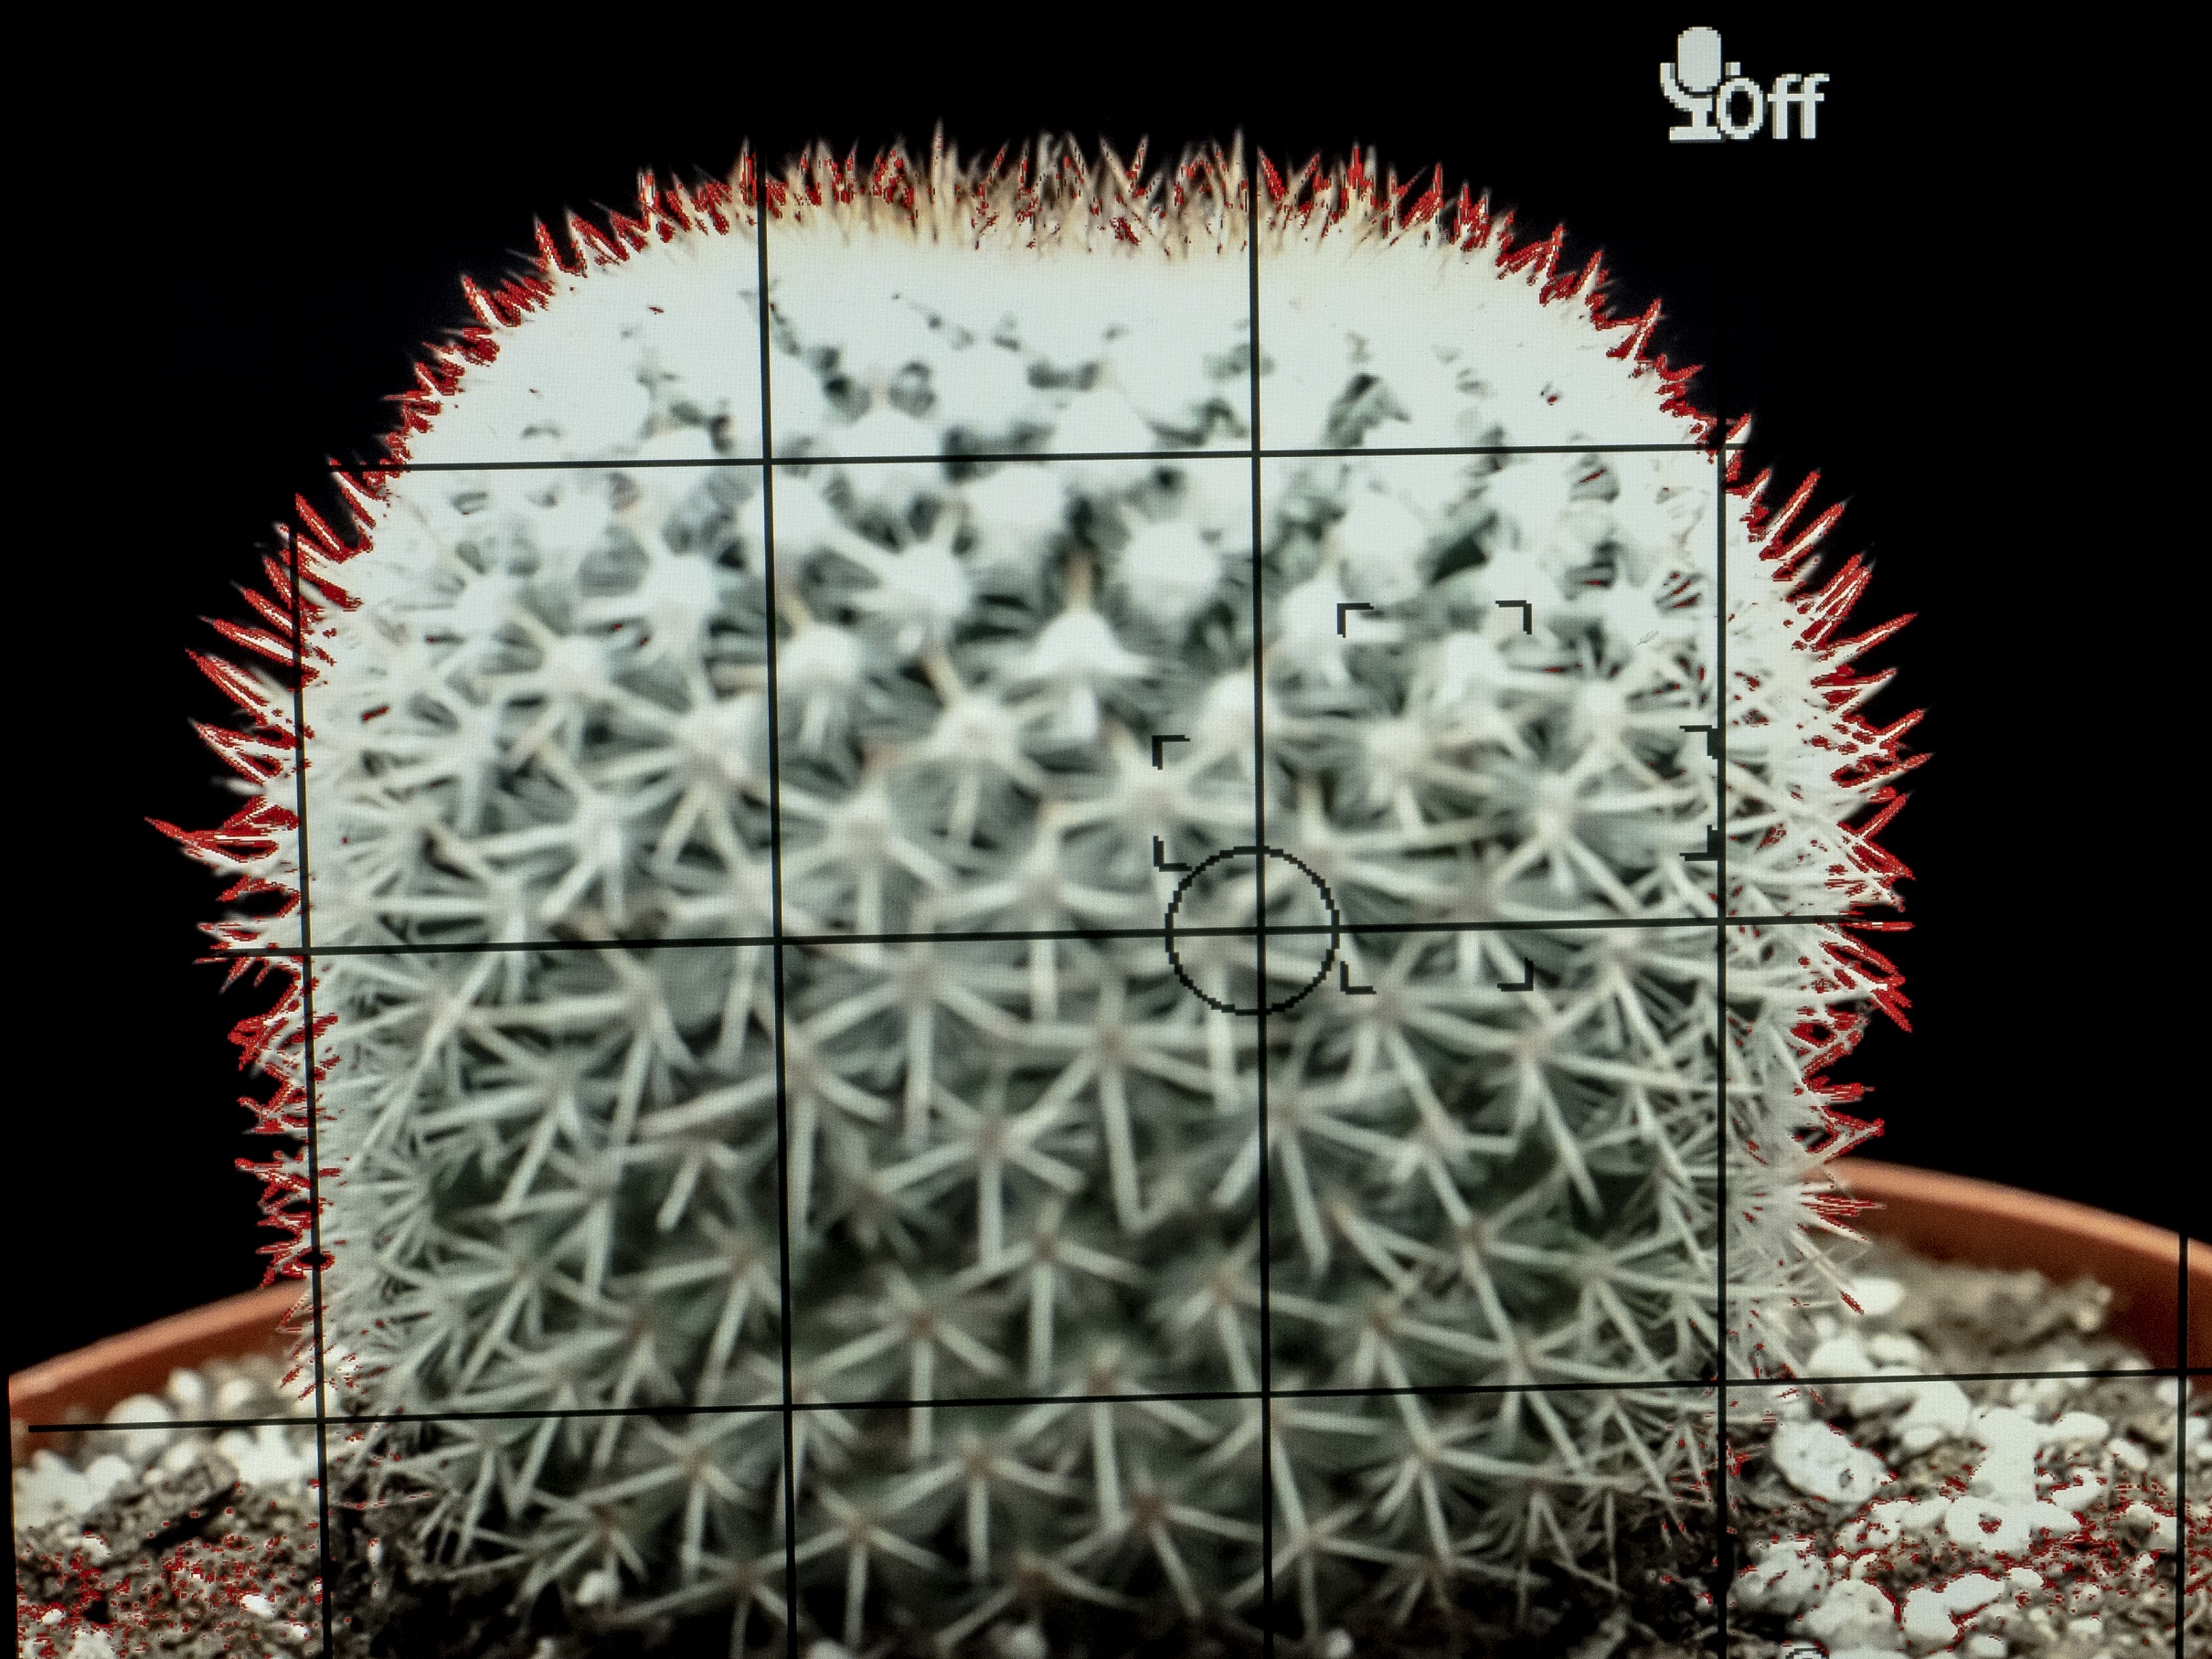
In the final image in the sequence, the focal point is near the farthest feature of the cactus that is in view, so that the spines that stand out against the background spines are on the top and sides of the cactus are in focus.
Cameras that allow functions to be assigned to specific buttons allow even better use of peak detection. When the button that has been assigned to MF Assist/Peak Detection is depressed, MF assist is turned on without requiring the rotation of the focus ring. This is useful for assessing the effects of changing aperture or changing focal length when working with a zoom lens. There is an excellent description of Peak Detection, which is also referred to as focus peaking, with additional images showing peak detection in action here:
https://www.bhphotovideo.com/explora/photography/tips-and-solutions/what-focus-peaking
When I started doing up close photography, I used AF almost exclusively because my vision was not sharp enough to focus precisely with MF. But using AF also had problems, often requiring multiple shots to get sharpest focus where I wanted it. I would take a series of shots and choose the one that most closely approached the image I was after. This was inefficient and frustrating but worked better in practice than MF. In many cases neither AF nor MF were precise enough to result in images that could be printed any larger than 4×6 or 5×7. Then I acquired my current Olympus camera, the first camera I ever had with MF Assist capabilities. I now use MF with peak detection 95% of the time when doing up close photography and am much happier with the results.
The next post will continue discussion of the capabilities of contemporary cameras related to focus, particularly back button focus, focus stacking and using autofocus with moving subjects.
You can find the next post here